Tag: Blender

  • Holding Columbo to ransom

    Holding Columbo to ransom

    I’ve been exploring Inkscape a bit more recently. On the back of the pop art images I did previously for Columbo and Murder, She Wrote, I found that I can take an image and posterise it using Inkscape. I’d already done this using Blender, to make a Jason Mantzoukas / Taskmaster design (which I realise I haven’t blogged about) to celebrate his energy in Season Series 19. I wanted to see what Inkscape could do. But what to make?

    Posterised image of Jason Mantzoukas from Taskmaster Series 19.

    Ransom note

    Looking around for inspiration, I had a found some Punk aesthetic boards on Pinterest. One, a poster for Blondie from 1976, popped out. This might not be an original image, but the aesthetic and the colouring – vivid yellow on black – are what drew me to it. The ‘ransom note’ style is also seen in the merch of punk and indie bands to give a home-made feel to posters, fanzines and other advertising.

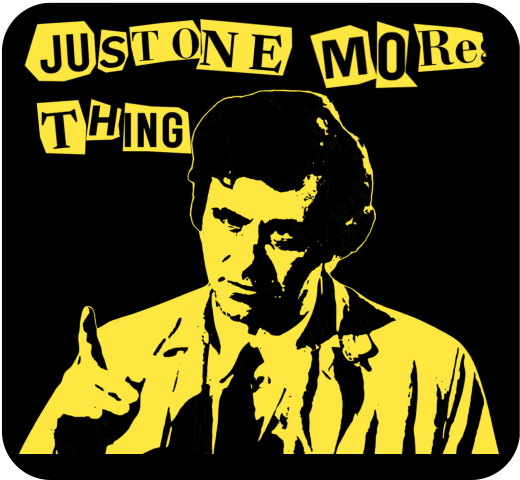
    Inspiration (left) and end result (right) for the ‘Columbo ransom note’ design.

    Columbo’s catchphrase – “just one more thing” – would arrive when he knew he had the killer and had found the weak spot in their story. That, and Columbo whistling This Old Man, were the signs that the clues were there. But had we, the viewer, seen what Columbo had seen?1

    Making the catchphrase into a ransom note makes it rather more sinister than Peter Falk would ever dream of. I had a few options of how to make the letter, the simplest is to use a ransom font such as Hit me, punk! and Fanzine. The drawback is that the letters are regular, so all the ‘a’s will look the same. So I did a slightly more complex route so I could have random shapes around the letters.

    I typed out ‘just one more thing’ in Canva, duplicated it a few times and changed the font for each repeat. There’s a mix of serif and sans-serif, to mimic headlines and banners in newspapers, then downloaded the page of text. Letter spacing is varied a bit, and I also added letters to make it possible to clip a neighbouring letter to add a bit of realism.

    Source text for the ransom note.

    I used an app in Canva called ‘choppy crop’ to roughly cut around an image. I took the page of text and, using choppy crop, cut out letters and small groups of letters to use in the final design.

    Columbo stencil

    To get the image of Columbo himself I used Inkscape. I had a go in Blender, but I fond the Inkscape image slightly better. There is a yellow outline in the Inkscape version (right, below) that sets the image off against the black background.

    Columbo ‘stencil’ done using Blender (left) and Inkscape (right). The Inkscape version took a bit longer to do, but the result is better. If I could have found a way to add a yellow outline around the Blender version, that may have been preferred.

    I’ve used this to make patent images by removing background, but the ‘Trace bitmap’ function can be used to posterise an image. In this, the colours or grey levels (you can chose which) are fitted into bands of similar shades/ colours. You can determine how many shades; to remove a white background on a black printed document you would chose two and delete the white bit. For images of people I used more; in Columbo’s case it was 19. That’s 18 for him plus one to be deleted for the background.

    With 18 layers of varying grey, you have to determine how many shades to keep yield an image that is interesting but also recognisably Peter Falk when it’s rendered as a yellow on black.

    The easy way to do that is to turn all the layers yellow, add a black background and hide the layers from ‘dark’ to ‘light’ until it looks good. In the end you’re left with black areas of shadows, yellow highlights and – if you’ve done it right – a recognisable picture.

    Video fun

    One of the more popular types of video on YouTube shows simulations of walls of blocks being smashed. I’ve done a few of these; Mrs S suggested I try to make a video with my designs on a wall that gets smashed down.

    The simulation – done in Blender – collected a few different techniques. To add some realism, I had two walls – one of bricks and one of plaster – both of which get smashed by a ball and also interact with each other. There’s dust and also some grime around the edges of the wall and dust and debris that gets thrown out.

    1. Of course, we knew who the killer was, but how did Columbo catch them? There is a theory that Columbo was actually a hopeless incompetent who only got the killer because a TV crew was there to film the murder. ↩︎
  • How to turn an idea into fake reality?

    How to turn an idea into fake reality?

    I think I’m getting better at doing stuff with Blender. One of the side effects of this is that I can think about Blender’s capabilities and apply them to designs and animations that I can use in the Heath Way Prints shop and as adverts for the shop.

    Turning blocks

    The sketch below is from my notebook1. I did this one evening and set about making it the next day. It took a few hours of a day I’d have otherwise spent doing the crossword2, watching the Tour de France3 or interacting with my family.

    Notes on the construction of the ‘six cubes’ workshop animation.

    I knew I could do the animation. However, some of the ‘how to’ bits needed me to dive back into the University of YouTube. In particular, the use of Drivers to simplify the animation needed a refresh.

    Blender Drivers

    Put simply, a Driver is an object that affect another object in an animation. For this animation, I had two drivers. One driver rotated 90° back and forth. The angle of this controls the position of four of the cubes, just as a real mechanical lever might. The second rotated through 360° throughout the animation. The angle of this driver’s rotation controlled the rotation of all six cubes.

    The video below shows how drivers work.

    Driver demo. I’ve animated the red cube to go up and down. The blue cube turns as the red cube moves, and the colour of the third cube also changes. You can control many different objects from one object. Not sure of the limit, but the six I’m using in the turning cubes design is well inside the capability of Blender.

    The animation of the drivers controls the movement of the cubes. Setting up the drivers makes timing the animation simpler than animating each cube individually.

    Display board images

    If you can decipher my writing, you’ll see that I planned to have one big image with four design adverts on to be displayed. I made the single image with four designs in Canva. The fiddly bit was making sure the faces on the cubes matched the parts of the image that had to show. This took a while to get right, but I plan to use this setup a few times, so it’s worthwhile making the effort.

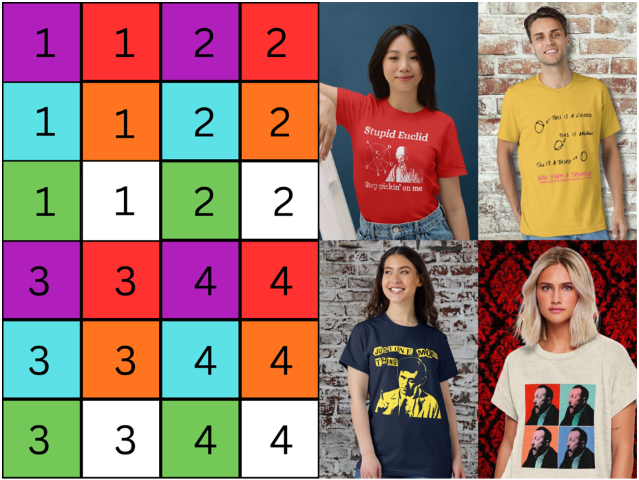
    Each face of the six cubes is mapped to an area of the image. To set this up I made a grid with numbers and colours to stand in for the final image. I made sure each face that needed one had the right part of the right image in the right orientation, after which I could substitute the image I wanted to use for the advert.

    Calibration grid (left) and the four images that show on the cubes once they are rotated in place.

    Put it all together

    There’s a few extra bits I added to make it look like an item that’s been installed long-term in a workshop environment. Some grime, a bit of background noise and camera shake. Ferrules cover the holes where the rods at the top and bottom of the unit go into the floor and upper display. This is to hide the otherwise odd-looking holes where the rods disappear. It also gave objects for the grime to collect against.

    Future stuff

    Other things to add might be a lever in front or to on side of the cage and a control knob that turns to show which cube is being shown. But that’s for the future.

    1. Yes, that really is my handwriting. You won’t think of anything to say about it that I haven’t heard over the last 50 years. ↩︎
    2. This week’s Private Eye crossword is giving me trouble. ↩︎
    3. I can’t get used to the Channel 5 commentary. Rob Hatch leaning into the pronunciation of French and Spanish names is a big distraction. ↩︎

  • No chicks were harmed in the making of this video

    No chicks were harmed in the making of this video

    I started this video over a month ago, an Easter themed ‘ball into blocks’ thing then got on the idea of adding little chicks on Thursday. Two days later, it’s done!

    Things crash into towers

    I’ve used Blender to make a couple of videos of things falling on blocks, and there are a lot other, better animations out there.

    I made all the blocks and the things that fall on them well in advance, but I felt there was something missing. The element of fun, maybe some funny little chicks. I made the chicks following a short tutorial by Grant Abbitt.

    Stills from the four episodes. Top left: all the chicks. Top right: Hundreds and thousands and a giddy chick. Bottom left: mini eggs and one chick. Bottom right: A huge egg and a very happy chick.

    I made four animations for this, all based around the same set of chocolate coloured blocks. The first was just the chicks. Then some hundreds and thousands (1500 of them) and an over-excited chick. Some mini eggs next, and a chick bouncing away offscreen. Finally, a massive egg and the final chick really enjoyed himself.

    Sounds

    For the sounds I use a mix of previously downloaded noises (mainly the blocks tumbling), one I downloaded for this (the squeaks and ‘wee!’ noises) and stuff I recorded myself.

    I downloaded Audacity a few weeks ago, I have decided that I can get better voiceovers if I (or Mrs S) do the talking. The AI voices are good, but the intonation, pronunciation and tone aren’t controllable.

    With Audacity I can remove background noise1. Some fiddling with the EQ is likely to be necessary for voiceovers, but for this project I could use Audacity to change the pitch of the recording. That’s why a couple of the voiceovers sound a bit mechanical – it’s a side effect of dropping the pitch two to three tones.

    1. Mainly the hum of my laptop, but also the freezer that’s next to the desk. The office is a converted garage and the chest freezer has to go somewhere. ↩︎
  • Logo cloth reveal in Blender

    Logo cloth reveal in Blender

    I’ve had the Heath Way Prints logo for about a year, and I’m happy with how it looks. In a recent advert I used a spinning version of the logo as the end scene for the carousel I made using CapCut.

    Making and ident

    How to expand on this? One thing I saw a few months ago was a cloth reveal. You start with cloth over an object then pull it away using ‘hooks’. In the display, the crosses are hooks, and pull at two parts of the cloth to reveal the monkey head.

    This works well, it can be used for revealing cars and big bits of machinery as well as logos and monkey heads. But I wanted to have the HWP logo suspended in air and then have the cloth be whipped away. Using the ‘hooks’ method wouldn’t work. I couldn’t find a way to animate the influence the hooks have on the cloth, which would mean I could turn off the hooks, so I’d have to get the hooks in the right place on the draped cloth. This is possible but not elegant1.

    Getting the cloth on top of the logo involved adding a plane to be the cloth, subdividing it and then giving it cloth physics. The logo had to have physics, too, otherwise the cloth would drop through the logo.

    What I found was that the logo didn’t interact very well with the cloth. So I added a cylinder the same size as the logo and used that as the collision object. That worked. Then the cylinder is adjusted so that it doesn’t appear in the final render and I still have a logo that has three dimensions.

    Another option I considered was adding a cylinder and ‘painting’ the logo on this. I could then alter the shading of the cylinder so that only the logo would appear. But this would be less satisfactory because I’d end up with a 2D logo rather than the 3D object that reacts to light and looks real. Having a 3D logo means I can animate it or move the lights and the surfaces react to changing light.

    Cloth draping on the Heath Way Prints logo. But how to take it off again?

    So we have a cloth draped on a thing. How to pull the cloth off without using hooks?

    Gravity!

    Changing gravity

    Unlike the real world, you can control gravity in Blender. It is a fun thing to do, you can make a pendulum simulation under various gravity fields to simulate Earth, the Moon, and Jupiter.

    Pendulum simulation with different gravity values. The Moon (1.6 m/s²), Earth (9.8 m/s²) and Jupiter (25 m/s²). The pendulum swings once on the Moon for every 2 ½ swings on Earth and four times faster on Jupiter than on the Moon.

    You can also change the direction of gravity. For this animation, I animated the gravity to change from -9.8 m/s² in the Z direction (down) to 20 m/s² in the Y direction (behind the logo) for two seconds so that the cloth fell from the logo. This is just like tipping the logo up, same way you might tip a table up to remove the tablecloth, if you were so inclined.

    Logo reveal in Boho colour scheme.

    Colours were taken from a ‘boho’ colour palette. I gave the logo a brown colour from the collection, the background green and an off-white for the cloth. The cloth also has a metallic sheen to it, to add a bit of class.

    Sounds were from Pixabay, sliding cloth effect fitted the bill nicely.

    Next: I’ll put the logo on some dice of various shapes and see what can be done with that.

    1. I’ve since found a way of doing this, but I like the effect I used. ↩︎
  • Bullet time in Blender

    Bullet time in Blender

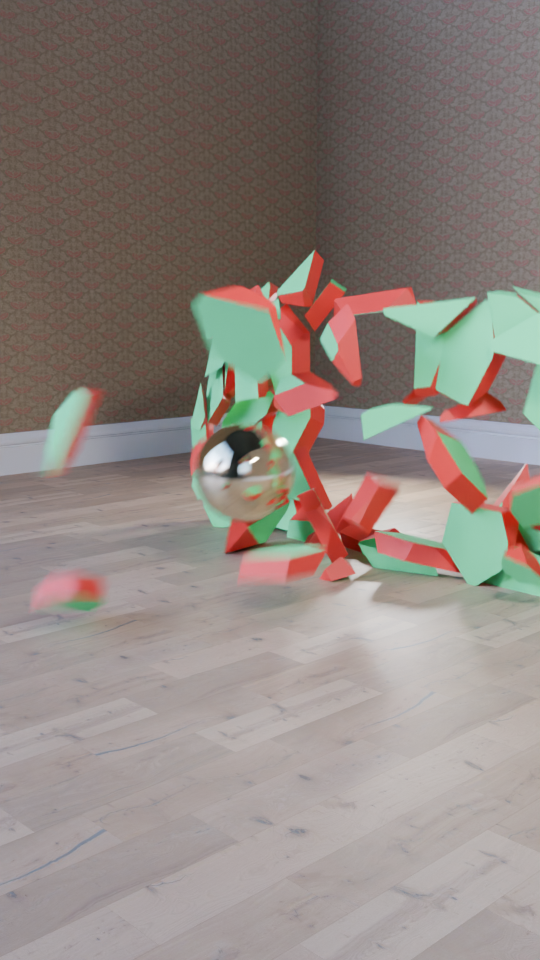
    I’ve been doing a course on visual effects, covering explosions and jet fighters flying over water. The essential part of making explosions is breaking up an object and then animating the collapse. This is what I did in my wall break-up video. Build a wall, break it into pieces and then throw something at it to break it up.

    Building collapse with loads of dust. No sound on this, that’s why you can’t hear anything.

    For the building collapse there were a few layers of simulation that needed to be done – the building itself, the windows and the dust. To save computer time the collapse of the building was done first and then the other simulations added. The walls of the building are made up of over 800 pieces, each of which is simulated to fall when a ball (which isn’t shown in the final animation) hits the bottom of the structure. That’s quite a lot of computing power. Then add the hundreds of bits of the windows and the dust, and that’s likely enough to crash most computers. So the simulation is done in parts.

    First the building collapse is simulated using rigid body physics. Once you’re happy with how the collapse looks, you can use the function ‘bake to keyframes’. The physics is removed and the motion of each part is animated.

    This means that there is less demand on the computer. You can then add a separate physics simulation – for the building collapse the windows were done separately and also baked to keyframes.

    Baking to keyframes also means that animation itself can be adjusted. One simple thing is to drag the keyframes for the explosion and create the illusion that the explosion has been frozen in time.

    All this sparked a memory from many years ago when The Matrix introduced live action ‘bullet time’, the illusion where time seemed to slow or stop while the camera turned around the subject. The way they did this was to use an array of 120 (or more) 35 mm cameras around the actor and trigger the cameras in quick sequence at the required time.

    This is one of the setups they used in The Matrix. As the actor jumped or fell backwards the cameras were triggered to capture the motion and then the images cut together to make the bullet time effect.

    Then the images were spliced together to make a few seconds of film. This harks back to the very earliest motion photography experiments of Eadweard Muybridge1, but with an extra twist.

    Could I do this sort of thing in Blender? Well, yes, otherwise I wouldn’t be posting this blog. I’d already figured out how to do a dolly zoom in Blender, so bullet time would be another interesting camera effect to work out.

    First I made a simple wall break animation. I say ‘simple’, I would have struggled with this a year ago. You make a wall by resizing the default cube. Then add loop cuts to increase the number of faces and vertices for the next step, which is the cell fracture. Add rigid body physics to the pieces and you can simulate a ball smashing into the wall. Once that’s done the bake to keyframes is done.

    Stretching out the keyframes was simple enough. I spread a few keyframes over two seconds of animation time so that the bits of the wall and the ball didn’t stop flying, but rather slowed right down.

    Then I added an ’empty’ to the scene half way up the wall. I parented the camera to this, so that I could animate the empty and the camera would follow the empty’s motion. I’d done this in the wizard’s workshop as an alternative to the follow path. Follow path gave a better result for the workshop; for this it was easier to use a rotating empty.

    The camera would stay in one place until just after the ball smashes through the wall. Then, during the slow motion the camera pans around and then stops as the action starts up again.

    Once all that was sorted, I added some background details – wallpaper and a skirting board to look like a home. And some sound effects, too. I couldn’t find exactly what they used when Carrie-Anne Moss jumped up and kicked the policeman, so I got something weird from Pixabay, the site I usually use.

    Final bullet time video. This one does have sound.

    I’m sure Keanu would be pleased.

    1. Or Edward Muggeridge as his mum called him. ↩︎
  • Slicing a cube and smashing a vase

    Another ‘Blender goes wrong’ video.

    This is a combination of two tutorials from YouTube. The first was making a twisted vase, the second was making a laser effect and slicing a cube. The ‘problem ‘goes wrong’ stems, once again, from the director rushing through without checking everything is safe.

    One of the things people do with 3D printers is print vases. They aren’t normally useful as vases since the prints are difficult to make waterproof, but they can be decorative.

    So a simple twisted vase was a thing I made a month or so ago. I used a deform modifier and multiple twisting modifiers to make the vase into an interesting shape.

    Model of a twisted vase. This might be suitable for 3D printing.

    Laser cube cutting

    The cube cutting was a more complex proposal. Although the instructional video by “Blender Made Easy” was about 30 minutes long, it took me rather longer than that to finish.

    However, this tutor is one of the good ones. There’s no ‘rest of the owl’ here, the tricky parts are gone through and exactly recreating the cube cutting can be done even by a bear of little brain.

    The animation is a bit of smoke and mirrors. The first thing to do is slice a cube. Then give the pieces physics (rigid body physics in this case) and animate when they become active parts of the scene. Once they are active, they obey gravity and fall to the floor.

    Then you make a path for the laser cutter to follow before modelling a laser pencil and the laser beam itself, which follow the path. This is the cutting of the cube and is the most basic version that could be used as an animation.

    Raw setup of the cutting video. The vase is in place, floating in air. The dark lines that criss-cross each other is a continuous path that the laser pen follows and cuts the cube and the vase.

    The use of ‘dynamic paint’ added an extra layer. Here, the laser beam is made to act like a brush and ‘paint’ a red glow on the cut surfaces of the cube. This is made to fade over a short time but it looks like the pieces are heated up by the laser then cool down.

    Sparks add a further layer. This is done by generating particles and turning those particles into small yellow spheres. Adding motion blur to the animation means that the sparks don’t look like spheres in the final version.

    Sparks added to the cube cutting. On the left, motion blur has been added to hide the fact that the sparks are small spheres. One the right, without motion blur the sparks look more like spheres. You also get to see the details I added to the laser pen, which is a bonus.

    To make the thing more my own, I changed a few things. First, the path that the laser takes is changed to go above the cube. Second, a vase is positioned and cut by the laser. Then background bits – a marble slab for the vase to sit on and a few more vases to fill out the scene.

    The wall is modelled on many walls I have seen in various labs. Bumpy green plastic panels separated by smooth plastic joints gives a workshop feel to the animation. They also help give a scale to the whole animation.

    Finally, sounds to make the whole thing come alive. Sound effect of the laser cut, metal sliding on metal and the vase shattering were all available on Pixabay. There’s a background of ‘workshop noise’ that fills in the soundscape. It was a matter of getting the timing right before rendering the whole thing and putting it on YouTube.

    Final cut

  • Baaa Humbug!

    Baaa Humbug!

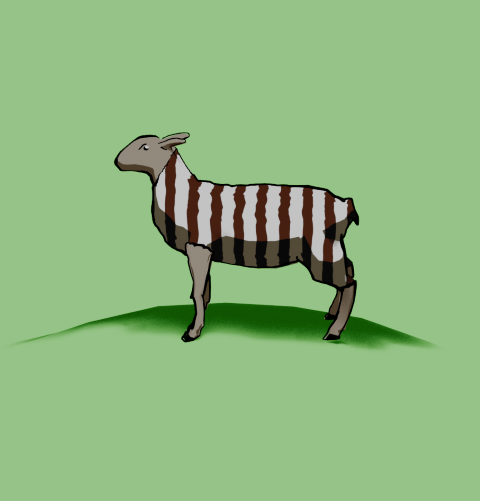
    A Heath Way Prints design.

    The ‘Baaa Humbug!’ design on a t-shirt, apron (with holly), cushion and pin badge.

    This was an idea from Mrs S – a sheep with a humbug1 body.

    Sheep building

    The modelling of the sheep was the main challenge here. I decided to go for a ‘low poly’ design, similar to the fearsome dinosaur I made as part of the course I did in March ’25.

    Returning to the University of YouTube, I followed a video by Ryan King, who is a reliable tutor and another one who doesn’t skip the fiddly bits. He made a duck, a shark and a dog in this tutorial, the dog was the best one to follow for the sheep, what with having four legs and all.

    Making a low poly sheep is an exercise in making a tube and shaping it to match a sheep (I used a photo of a sheep as a guide) and then adding legs and ears.

    The start of the sheep construction process. Using a side-on view of a sheep, a tube is extended and squidged to make a sheepish body. Legs are added by extruding from the sides.

    Shading

    The shading was the complex bit. I wanted to have a cartoon look to the sheep because that’s an aesthetic I like and also makes the final print a bit clearer.

    I’ve done quite a lot of cartoon shading over the last couple of months, the tricky part was getting more than one colour onto a cartoon.

    The basic cartoon shader. It converts the original colour to RGB (not sure why), then the colour ramp restricts the colours to two shades, dark and light. This gives a cartoon shading effect that I’ve grown fond of.

    Doing one colour is easy enough, it’s two shader nodes. Adding a striped pattern and getting the stripes to mimic a humbug was a bit of a thinker. In the end, I found a way of doing it using various shader nodes.

    The humbug shader. I used a photo of humbugs to get the right colours. This is a bit more complex than the single shader, since the system needs to be told where to put the brown and white colours.

    So we can go from a plain white or brown sheep to a striped sheep. Then we need to add outlines.

    From left to right, a plain white coat, a brown coat (colour for the humbug stripes), stripes added and then with outline and frown drawn in.

    Outlines

    I’d previously used the system’s grease pencil to add lines to cartoons and it works well. For the cartoon mech, I just thickened the lines a bit but otherwise didn’t adjust the grease pencil added by Blender.

    Another variation of the two legged mech I made a few months ago. This cartoon version has ‘scene line art’ added, automatically adding lines to the model.

    Well, most of the time it works well. But this time it didn’t, adding lines where I didn’t want them and missing out other lines. So I had to draw the lines myself. I’m part way through an 2D animation course so I had learned about adding lines and editing them already. I applied this new knowledge to the sheep, using a drawing tablet I bought a few months ago. This meant I actually learned how to use it.

    My graphics tablet. This one cost £24, the ones professionals use can be in the hundreds of pounds, even over a grand. I’ve also just noticed that there are thumbprints on the left side where I hold it.

    Once I’d drawn the lines I was able to adjust them. Because I’m not much of an artist and I’m not used to the graphics tablet, the lines weren’t perfect. However, because they are digital, the lines are editable, so I could move and stretch them until I was happy with the look. This is similar to the way I sculpted the virtual clay to make Bob the demon and Steve the orc. I didn’t want it to be too perfect, just believably hand-drawn.

    Somehow, I managed to get the sheep looking really grumpy as well. A fortunate accident with the line I drew for the eye ridge.

    Final design

    I exported the final sheep into Canva to add the background and lettering. The font is IM Fell English, based on an 18th century script and so perfect for an olde worlde feel.

    One version of the “baa humbug” design.

    Because I’m using RedBubble rather than Etsy, I can offer the design on a variety of things. In RedBubble I can also specify the background colour to be used in the designs; I can do that in Canva, too, but the shape of the different products means that sometimes there can be white space at the sides or the design looks too small on the product.

    Baaa humbug design on an apron.

    At the suggestion of Mrs S, I added a sprig of holly to the design that goes on the apron. Not sure why, but it works for the apron but not for the other items such as t shirt and cards.

    1. Humbugs are striped, mint-flavoured sweets. ↩︎
  • Game over!

    Game over!

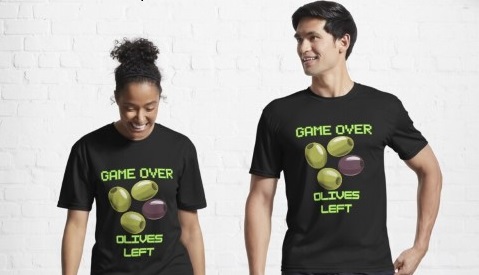
    Heath Way Prints design.

    This was a cryptic crossword clue I thought of some time ago, and realised recently it would make a good t shirt/ mug/ mouse pad etc.

    Canva design

    I think it took me about 20 minutes to do this, all in Canva. Deciding on the fonts to use was the tricky part. What I really wanted for the ‘Game Over’ part was the sort of font used in Rollerball1 and throughout the 1970s to indicate that a computer was involved. There is a font called Rollerball, though Westminster is also available for Word, but I couldn’t work out how to get that in to Canva. So I used Retropix for the Game over, and HK Modular for the Olives left. A nice neon green, reminiscent of the old green screens I spent my early computer years staring at completed the text design.

    Example text for the Westminster font.

    The olives were taken from a Canva catalogue of designs. There were plenty of olive designs to choose from, the three green and one black in a cartoon style was the best, and similar to what I might have designed myself.

    Once I was happy with the design I downloaded it from Canva then uploaded it to RedBubble. Making sure the design looked right on all the products and writing the description and keywords still takes me some time, but I hope I’m getting better at this.

    I finished a social media marketing course in November, this taught me several things I had hoped to learn. How to build a website, the importance of keywords and how to do search engine optimisation. I’m still a beginner, but I now understand why you need to spend time doing the SEO, though the rules change all the time.

    Cryptic crosswords

    The clue I had knocking around was:

    Game over for oil producers? (6)

    The answer is ‘OLIVES’, because when you have no lives left you finish a game, and olives produce oil. The O and the zero look similar, and that’s how cryptic crossword clues work. I sometimes struggle with cryptics, I attempt the Private Eye one and sometimes I can finish it, other times I can’t get more than two clues.

    Another clue I made up a while ago:

    Advances in fantastic trousers (5,7)

    Comment if you know the answer.

    1. A 1975 film starring James Caan, featuring the titular ultra-violent sport and a lot of moody electronic music, set in the far-off dystopian future of 2018. ↩︎
  • Return of the Mech

    Return of the Mech

    I’ve finally figured out rigging, which means I can animate the mech I made a few months ago. Yay me!

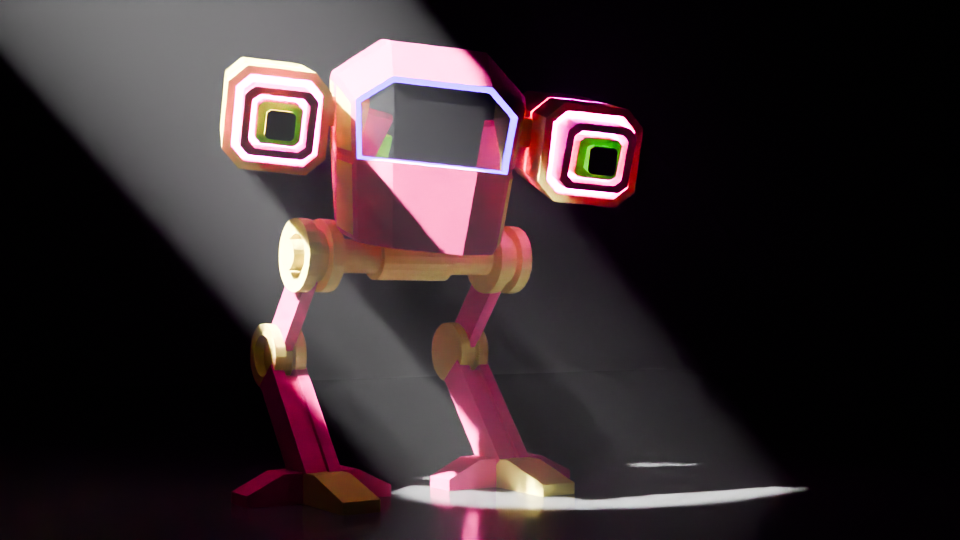
    Stylised two-legged mobile gun.
    Completed mech with colouring and glowing guns. The green glow around the windscreen is a classy touch.

    The mech I used had a bit of a different colour scheme, I have dubbed it ‘the fabulous mech’ due to the glittery guns and pink glow around the screen.

    Rigging involves adding bones to the design, linking those bones to the model, and moving the bones instead of moving the mesh of the body. This is just like how Aardman animate their models for stop motion.

    Blender viewport showing a two legged mechanoid with bone rigging.
    The grey shapes are the ‘bones’, they control parts of the Mech model. You can rotate the bones to make the head move and move the bones in the legs to make it walk.

    Moving the bones around using keyframes to control the timing of the mech and stuff. First trial was to have the Mech look around, notice the camera and step towards the camera.

    Mech stepping to the camera. Mean and pink.

    Getting a walk cycle for the thing was a bit fiddly. Moving the legs in a bird-like manner is easy enough, but getting the feet right and stopping them slipping needed a bit of fiddling about. Took me a while, but the result is pretty good. I wrote an Excel spreadsheet to help me with the timings of bone movement and getting the whole thing to move without ‘foot slip’, where the stationary foot moved backwards during the walk cycle.

    It’s a bit gloomy, but the fabulous mech is here to menace you!

    I’ll do some more on this later. The walk is mechanical (well, it would be). The lighting need to be improved so you can see the thing. I will add a swing to the hips and also movement of the head so it looks like the operators are searching for something.

    Stay tuned!

  • Falling cubes, tracking camera

    Falling cubes, tracking camera

    There are a few videos on YouTube (and elsewhere1) of piles cubes being dropped, weights being dropped on cubes and balls hitting piles of cubes. I’ve done one myself, and it’s quite satisfying. Destruction of things without actually wasting resources. I was asked if I was in need of some sort of catharsis. I don’t think so.

    I decided to mix it up a bit and have a series of groups of cubes dropping as the camera tracked past. The varying weights video (above) had a static camera. I rendered the different videos separately and spliced them together before adding sound to give it a bit of realism. The final bit where a flying cube hits the camera was the only camera movement I did. The shaking as the blocks hit the ground was done using an add-on called ‘camera shakify’2.

    Blocks of cubes

    First you make the cubes and then add physics. The easiest way to make a bunch of the same things is using an Array modifier, where you repeat an object a set number of times. So to make an 8 x 8 x 8 cube of cubes, I did three arrays of 8 in the X, Y and Z direction. Then the 1096 block need to be separated and given physics.

    ‘Physics’ in this sense means that the objects react to gravity and to other objects with physics. The video below shows how objects interact with ‘active’ physics, ‘passive’ physics and no physics. So the green cubes react to gravity and are stopped by the red passive objects. Passive objects don’t react to gravity or other forces but get in the way of active objects. The blue ‘no physics’ cube gets ignored.

    Initially I made four blocks of cubes: 2, 5, 8 and the 10-cubed blocks, and then set up the moving camera.

    Camera settings

    To get a camera to pan while it focuses on a moving spot you need two things. A line for the camera to follow and something for the camera to aim at. For this video, the line is a curve that runs mostly straight past the cubes and then curves around and up to finish with a view of all the fallen blocks. The camera is pointing at an ’empty’, which is an object that will not render in the final image. I animated the movement of the empty so that the camera would arrive just as the blocks started to fall.

    The camera itself has several settings, not all of which I understand. The one I do understand is ‘motion blur’, which adds a little realism to the falling blocks. The video below shows the effect in a simple scene. In the final frame of the video below you can see there is blurring of the cubes on the left and the animation looks a bit more realistic.

    Lights!

    Lights above the cubes turn on as the camera arrives. These are circular area lights, intense and powerful. I also added a ‘fog cube’ so the light beam could be seen. More lights, smaller yellow ones, and a back wall add some shape to the studio that all this is happening in. Getting this timed correctly is relatively easy, keyframes for the light intensity can be edited as needed.

    I noticed how high the blocks went for the 10 – cubed block and so I thought I’d see what happens with 12 cubed. And the cubes went everywhere. Drilling down into the narrative3, I thought that the set-up would have overlooked this and so the lights that come on as the camera tracks would be too low for the last pile and this light gets destroyed by the cubes.

    I added a cube above the light, did a cell fracture4 (only 20 pieces) and timed it so that the erupting cubes hit the fractured cubes as the physics takes over and the pieces fly everywhere. It just so happened that the end point of the camera track was just to the right of where one of the pieces flew.

    Video below is how the Blender screen looks as the final animation is playing. There are random colours added to each object so I can make them out. There is a small three-way axis that travels left to right – that’s the empty that the camera (the pyramid that travels along the black curve) is locked in on.

    Sound!

    Getting the sounds was difficult, it is usually the part I struggle with. I have various thumps, crashes and loud clicks saved, so they were easy to get. I wanted to have a director saying ‘action’ and then ‘CUT!” but could I find one? Could I bugger. So in the end I recorded myself as the director. The family don’t think it sounds like me, the microphone I used is a bit heavy on the treble.

    Two weeks after publishing it on YouTube it’s had about 500 views. The simple destruction videos seem to do a lot better than ones with a narrative. So I guess it’s back to explosions.

    1. Such as TikTok. I will post these videos there, see if I get any interest. ↩︎
    2. It shakes the camera. But you probably guessed that. ↩︎
    3. The narrative being that these demos are for real but the director is a bit hurried with his setting up and is under time and budget pressure to get the videos done. ↩︎
    4. I’d done a cell fracture demo, showing how a wall breaks with different levels of cell fracture. It’s had over 20,000 views. I guess people like things being destroyed. ↩︎
Verified by MonsterInsights