Tag: photography

  • Blender part 12 – Steve’s back again!

    Blender part 12 – Steve’s back again!

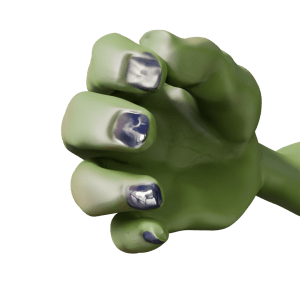
    So I fixed his fingers somewhat – still not perfect, I can’t get a good fist, but the fingers no longer twist in an awkward way.

    Orc's hand, gripping with straight fingers.
    After a bit of fiddling around, I got Steve’s hand to look a lot better. The fingers are straight, at least.

    Stand-up comedian

    As mentioned in a previous post, I’m a fan of comedy. Also, I’m a fan of Stewart Lee1. To my mind, he elevates stand-up to an art form2 and is also hilarious. To Mrs S he just drones on about stuff3. Anyway, I have a picture of the man in full flow.

    Stewart Lee in action.

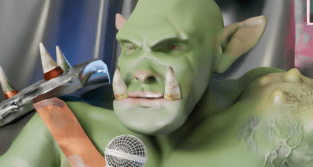
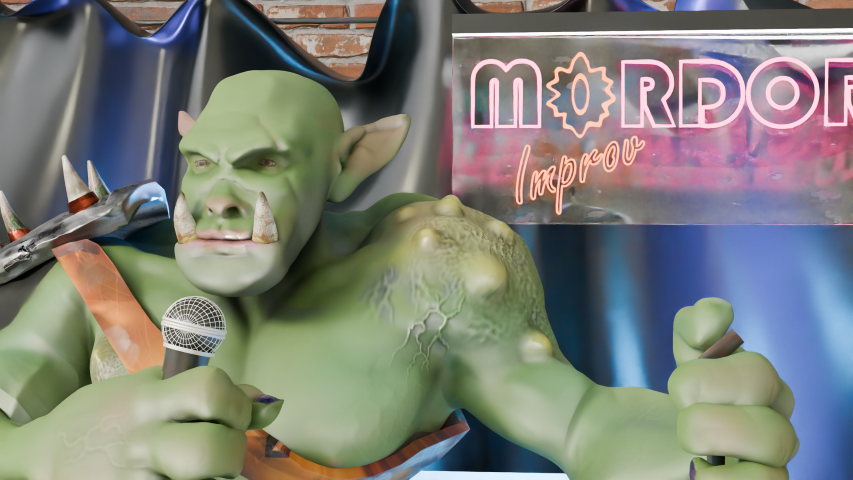
    This photo was the inspiration for Steve’s new job as a stand-up comedian. But to make it more obvious that Steve is in a comedy club, rather than giving a lecture (on the use of Lammas bread in recipes for hobbit), I thought it was necessary to add comedy club trappings. This means a curtain and lights such as Stew has and a neon sign so we know he’s in a comedy club. And a microphone, mike stand and a suitable pose.

    Aisling Bea wearing an orange hat under a neon sign reading 'Camden Comedy Club'.
    The sort of thing I was thinking of for the Mordor Improv stage. Sadly, Aisling Bea was not available for comment.

    The mike stand was the easiest part. A cylinder for the upright and another, cut in half lengthways, for the clip.

    The microphone was also fairly simple. I decided to just show the top of Steve’s hand, so I didn’t need to model the flex, mainly because the right arm looks a bit weird when it’s bent. So a cylinder, tapered a bit, a sphere as the inner part of the microphone and another sphere given a wireframe look as the input bit. And a flat cylinder as the metal ring around the bit you speak into4.

    Posing Steve wasn’t too hard since I’d done a bit of this already. Getting the hands to look reasonably realistic depended on getting the curl of the fingers right, which I had done already.

    Now I just needed to set the scene.

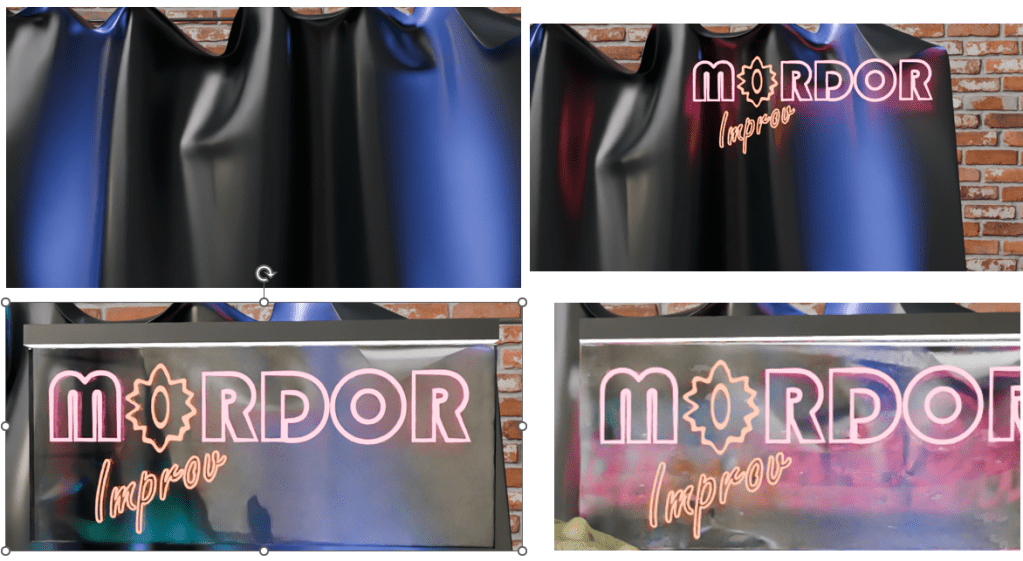
    Blender can add physics to an object, and the physics I needed for the curtain is the Cloth Modifier. Using this, an otherwise flat object can be made to act like cotton, silk, leather whatever you like. You can drop it, drape it or pin it in place to react to gravity and other forces.

    Cloth can be pinned in place to drape. You can also change how many faces are in the cloth. From left to right, there are 400, 4000 and 50000 faces. More faces means more drapable cloth.

    For this, I followed a tutorial to make a curtain which would hang behind Steve. And I decided that the Mordor Improv is a slightly down-at-heel establishment, so the curtain is drooping a bit.

    More interesting is the neon sign behind Steve. I had to go through a couple of tutorials to get from ‘I have this idea’ to ‘I can do this now’. Two fonts are in this – Bauhaus (Mordor) and Freestyle Script (Improv). The Eye of Sauron was originally the O of Mordor, pulled around a bit and given a different colour to look more evil eye-like.

    Curtain, original neon work, added plastic backing and as the sign appears in the final render after some bashing around.

    So now Steve has a job. He’s struggling to keep Sauron’s minions entertained at the Mordor Improv.

    Orc part way through a comedy routine. He's holding a mike, standing in front of a neon sign saying 'Mordor Improv'.
    “Two hobbits walk into a bar. Must have been a low bar.”

    If you have any Middle Earth jokes, let me know!

    1. Some would say the two are mutually exclusive. Mrs S, for one. ↩︎
    2. Strokey beard moment. ↩︎
    3. She’s right. But it’s the way he does it. ↩︎
    4. Sorry to get all technical with you, there. ↩︎
  • 3D printing an SEM image

    One of the things that has been rattling round my head for many years is the idea of 3D printing from an SEM image. I know, it’s a common issue and one you’ve all heard many, many times.

    In a previous post, I mentioned how I’d done some of this already using Blender and a bit of artistic licence. What I made needed to be printed in two part (one white, the other yellow) because I didn’t have access to a multicolour printer.

    3D printed oil in water droplet
    Original version of a 3D printed oil in water droplet. Some artistic licence required and I had to design and print in two parts. You can see the join.

    Scrolling through Blender instruction videos (as you do) I saw a post by Architecture Topics on how to convert an image into a 3D Element.

    This pinged a synapse in my brain and I wondered if the SEM of the broken oil droplet I took some years ago could be used in the same way.

    Scanning electron micrograph of a split oil droplet. I took this image about ten years ago and have been thinking about making a 3D version ever since. I can work faster. Honest.

    How hard would it be to convert the original image to a 3D Element?

    Rendering of convertion a SEM image to a 3D element

    Rendered version of the converted image. I’ve stuck to black and white since electrons don’t do colour. I could reasonably render this with a gold effect since the sample prep involved coating with gold to get better imaging.

    It took a while, but I got there. For the final render, I put the converted image into a box to hide the ragged edges of the conversion. Also I had the opportunity to go into my old work and have a go on the 3D printer there.

    After a bit of faffing (because I’d not applied a solidify modifier to the final image) I got a .stl file that the slicer said would print.

    My first attempt wasn’t great. I’d only applied enough solidify modifier to give the final print a thin shell. To quickly fix this, rather than going back into Blender and increasing the solidify level, I set the slicer to do 100% infill.

    That didn’t work. I’d need to go back to Blender and learn how best to use the 3D toolbox that I learned about while I was doing this.