Tag: art

  • Caffeine! mug

    Caffeine! mug

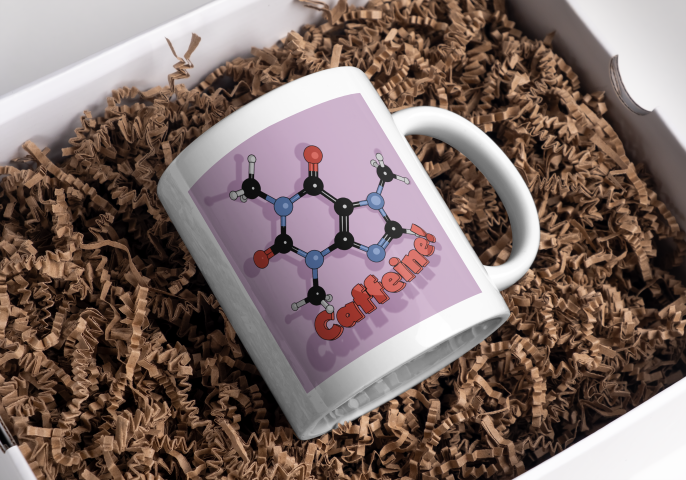
    A slight departure, this time I’ve designed a mug. I was thinking about what molecules would look good on a coffee mug and the obvious answer was ‘caffeine’.

    One of the things I had planned to use Blender for was to make scientific models and diagrams as well as protein and molecular models. How to do these things was another matter and how to make anything of them when the market for scientific diagrams is (a) small and (b) a closed shop were further matters.

    Having had the idea of caffeine-on-a-mug1 I hit the University of YouTube and found out how to get from a molecule to a 3D design, and then from a 3D design to a cartoonised version. This latter was a design choice – I thought it would look bold and also it would be a way of cutting down on the number of colours required for the design.

    I found a good tutorial by CG Figures who went through the two-step process to get from molecule name to a file that can be read by Blender.

    I was already familiar with one of the websites that was recommended – molview.org – and the software to convert the SMILES file into a protein database (.pdb) file was easy enough to use. The SMILES format is a standardised way of representing organic molecules and it was the format I used to input molecules of interest into a molecular modelling tool to predict the pharmacokinetics of drugs – SwissADME is the website, if you’re interested.

    Once I’d got the molecule model into Blender, there were a bunch of further steps to clean up the file into something that didn’t take up too much filespace and have extraneous faces that could give odd results when the image is finally rendered.

    Molecular ball and stick model of caffeine.
    The caffeine molecule after some tweaking of the initial file. The software adds colours by default, in this case grey is carbon, blue is nitrogen, red is oxygen and white is hydrogen.

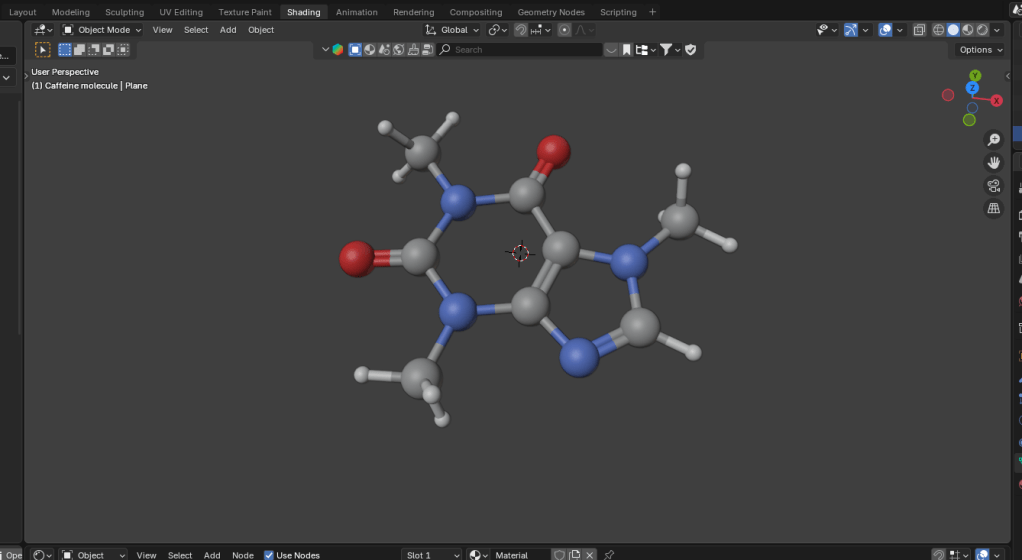
    It didn’t take long to get to the point where I had a model that I could use as a basis for a design. Next, I wanted to turn it into a cartoon version. This means that the light and shade are demarcated by sharp lines with no fading.

    In Blender there is a function called a “color ramp” which takes a colour or a shade and changes it. Using this I could control which parts of the atoms were darker and which had highlights. By moving the light around I could change where the light spots landed and also change the size of the highlights. And because the software sees the molecular model as a three dimensional object, the highlights vary around the model, making the model look more three dimensional, even though the idea is to create a two dimensional image.

    Three cartoonised images of a monkey head.
    Three cartoon monkey heads. Turning the head changes the cartoon lighting and adding grease pencil adds definition to the image.

    In order to add a more cartoony look, a function called grease pencil can be used to add black lines to the scene. There are two ways to do this. Blender can add grease pencil automatically, which is what I’ve done here. You can also add it manually so that you can put details on the image.

    Anyway, back to the caffeine image. Not only did I add the cartoon effect and grease pencil, but the molecule needed a caption so we know what it is.

    Caffeine molecule against a pink-purple background. The molecule has the caption in two fonts, Bauhaus and Berlin.
    Alternative fonts for the caption. I like the Bauhaus font (left) as a design choice, but the capital C is a bit too closed to read easily. Berlin font (right) has a similar vibe and a more open C.

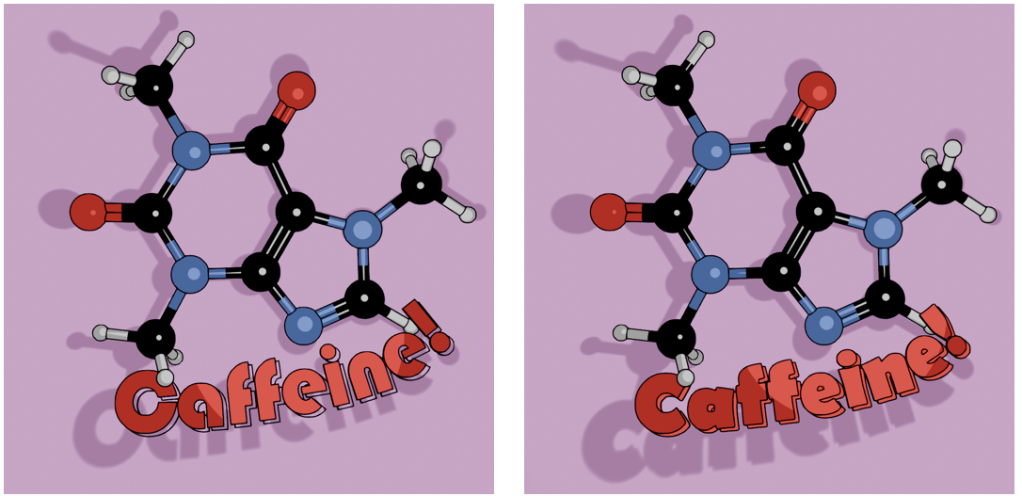
    Looking through font choices I tried Bauhaus – it’s bold and has a historic feel to it. After showing this to Mrs S, I changed to Berlin. She pointed out that the C in the Bauhaus font is a bit too closed, and the Berlin version looks better in this application.

    As an alternative, there’s also the molecule on a mustard-coloured background and in German. I’ve yet to offer these alternatives in the shop, I don’t know how big the German market for nerdy science mugs is2. I will likely keep the Bauhaus font for this, since the K looks echt cool, oder? I’ll need to use either Berlin or another font for the French (caféine), Spanish and Portuguese (cafeína) and Italian (caffeina) versions.

    Two view of caffeine (Bauhaus font) and Koffein. Mustard yellow background or pinky purple? Which is better?

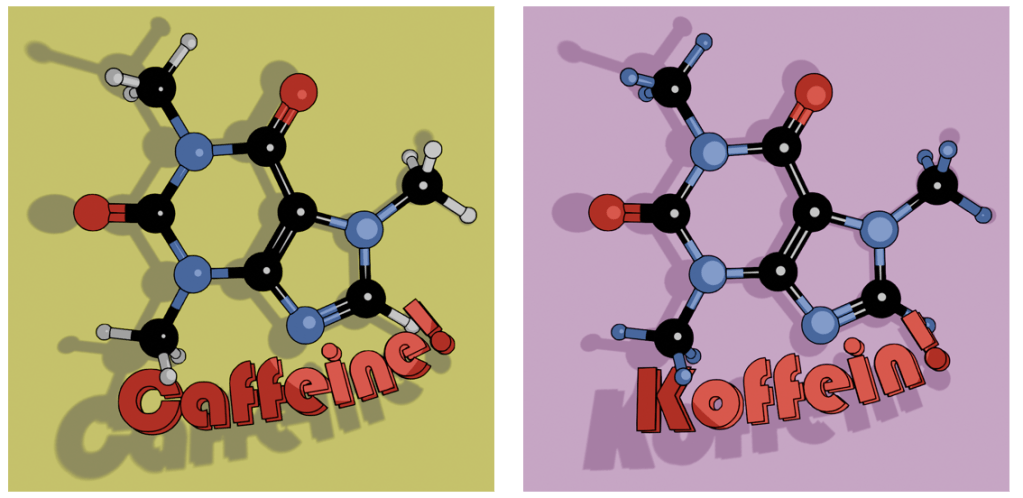
    I can try other background colours, but I’m not sure what works best. Any suggestions are welcome.

    The finished design could then be uploaded to Gelato so I could put that onto a mug and then get it published on Etsy.

    White mug with a cartoon caffeine molecule on a pale purple background, and the word 'Caffeine!' underneath.
    Mock-up of the finished mug nestled in a bed of curly brown stuff.
    1. It’s not an original idea. There are plenty of other places that sell this sort of thing, but I wanted to use a different style. ↩︎
    2. Caffeine translates as ‘koffein’ Danish, Dutch, Finnish, Polish, Swedish and Norwegian as well. ↩︎
  • Blender part 9 – GameDev III

    Blender part 9 – GameDev III

    Orc painting!

    Last time, I had made a nice looking orc1.

    The next stage was quite complex and not very visual for blogging purposes, except that the end result was obviously an image. It involved baking textures and it’s why we spent time on getting the musculature and the facial features right. It’s all to do with poly count.

    The number of faces (polygons) in a model is an important factor in 3D modelling. The more faces you have, the better your model will look. The drawback is that these polygons take some time for the computer to calculate. This slows down your work and can result in the computer crashing.

    By way of illustrating this, the face count for the model shown at the end of the last section and below was 14.5 million and a file size of 160 MB. By baking the textures onto a lower poly duplicate of the original, this comes down to 47,000 faces and a 64 MB file.

    Two orcs, one white the other painted.
    The unpainted orc on the left as 16 million polygons, the painted one on the right has 47,000 and more detail. The down side is that I can’t easily change anything about this model.

    Baking is the process where details from a highly detailed model, such as shadows from clothes and weird veins and scars, get painted onto a lower poly mesh. The details aren’t there, but look like they are.

    Baking textures allows you to use a low poly mesh that looks like a high poly mesh. The disadvantage is that you can’t change you mind about, for example, the position of the clothes once the bake is done. You can always repeat the bake, which takes a bit of time and isn’t very exciting.

    painted orc figure posed in a grabbing manner against an industrial backdrop.
    Now that the rigging is in place, I can move the orc to give it an action pose. Might need to move the loincloth, it looks like it’s digging into the thigh.

    In the end, I’m happy with how Steve turned out. There are a few mistakes with the painting, but if you can see them keep it to yourself. I should go back and re-do where I went wrong as an exercise.

    So I had an orc with bones that I could manipulate and pose in a threatening manner. But the hands were wrong – the fingers looked awful when I tried to make them grab anything. That was the next thing, because I wanted to make Steve grab things and make a fist. That was for another time, though.

    Two views of the orc’s right hand. The rigging allows you to move body parts and the controls for curling the fingers are simple enough. However, I did something wrong when I set the fingers up because the fingers don’t move properly.

    So that was the course finished. Next up, I’ll have a look at getting realistic textures onto objects and then I’ll try and get those hands looking right so I can pose and animate Steve. And don’t forget to look for science-related opportunities for Blender.

    1. You know what I mean. ↩︎

  • Blender part 8 – GameDev II

    Blender part 8 – GameDev II

    Let the orc begin!

    When I made Bob the non-demon (see below) I was introduced to sculpting in Blender. Virtual clay you manipulate with a mouse without having to consider gravity and then paint any colour you like offers huge opportunity for creativity.

    3D rendered image of a demon with orange eyes and horns.
    After lighting and colouring, here’s Bob.

    This promised to be a longer sculpt, since we were making not only a head, but a body and some rudimentary clothes – boots and a loincloth. I’ll split into three parts. Second part will look at the finishing of the sculpt, the third will look at some of the other stuff we can do with posable figures.

    We used squashed spheres to block out the main shape of the head, body and hands. It’s the hands that proved the most tricky to get looking good. Later, the hands were to cause quite a lot of frustration when it came to rigging. But I’m getting ahead of myself.

    Triple image showing progression of orc sculpt.
    Progression of the orc sculpt. From blobs, to a bit of shape, to rough definition of muscles and hand. We only did one half because we can apply a mirror to the sculpt once we’d done fiddly stuff.

    The body was the first part that got any proper attention. We added clay to the spheres and built up the main muscle groups. For much of the lessons I wasn’t sure what the end goal was, other than the final orc. So we spent some hours adding and refining the musculature, getting the boots right and sculpting a loincloth and belt shield.

    Progress of the sculpt. The face was a detailed task, since we want to give the orc some personality. Then adding detail to the body muscles and then adding clothes to cover such bits as an orc feels it necessary to cover.

    I’m not sure why, but I didn’t save any of the progress during the face sculpt; it followed a similar path to the work we did to create Bob, but adding tusks and shaping the mouth around them was different.

    Next was to make the basic figure a bit more characterful. As with Bob, this involved adding asymmetry, scars and general wonkiness to the face. Further, this time we added ugly lumps and diseased parts to the orc. It was a shame to do this, I’d spent some time getting the musculature of the shoulders right and they were covered by the shoulder plate and the hideous growth that I added.

    To make the orc a bit more interesting and to seem like he’d had a bit of a life, we added unsightly lumps and a horrible growth to his left shoulder. That’s what happens when you mess with wizards.

    Raised veins were added using a texture brush – basically paint on a texture and it makes whatever shape is on the brush. I’d need to go back and be reminded how to do that again.

    As part of the messification of the sculpt, we had added some detail to the belt boss and bashed the metal bits around because this orc has seen action.

    It was about here that I showed the sculpt to our daughter, who named him ‘Steve’.

    So I had an orc ready to colour in and use to learn about animating characters. But that’s for next time.

  • Frank Whittle: The Inventor Behind Modern Jet Engines

    Frank Whittle: The Inventor Behind Modern Jet Engines

    Another T-shirt design, this one based on a patent image.

    Frank Whittle – a summary

    Air Commodore Sir Frank Whittle (1907-1996) was a test pilot and flying instructor, but he is best remembered as a pioneer of jet aircraft. It was he who convinced the British government that the standard propeller engines had speed limitations (based on calculations made while writing his thesis) and that yes, he had a solution.

    The problem was that conventional engines with hundreds of moving parts would inevitably fall apart when pushed beyond what was possible with contemporary materials. The solution was to reduce the power plant to a single moving part. He needed people to believe in his solution. He also needed money, which the government of early 1930’s Britain was reluctant to give him.

    Sir Frank Whittle with a slide rule.
    Sir Frank Whittle (1907 – 1996), one of the pioneers of jet propulsion.

    He co-founded Power Jets Ltd in 1936, a company which was able to exploit his 1930 patent for a turbojet engine with only one moving part. By the time the Second World War started, he had finally convinced the government that he had a usable and safe design. They bought the experimental engine from Power Jets and lent it back, allowing the company to continue until the company was nationalised in 1943.

    All this effort took its toll on Sir Frank. Nervous exhaustion forced him to retire from the RAF in 1946, but not before a further jet propulsion system could be patented in his name. It is this that forms the basis of the new t-shirt design.

    Discworld connection

    The term ‘Whittle’ came up in the Discworld series. In “Guards! Guards!” we are introduced to Lady Sybill Ramkin, a wealthy resident of Ankh and enthusiastic breeder of swamp dragons (draco vulgaris). She used “whittle” as a term for disappointing dragons such as Goodboy Bindle Featherstone of Quirm (aka Errol), who would never amount to much. Short, stubby wings meant Errol would never fly and would therefore be incapable of mating.

    Sam Vimes, Captain of The Watch, reflects on this dismissive adjective:

    Total Whittle, Vimes thought… It sounded like whatever it was you had left when you had extracted everything of any value whatsoever. Like The Watch.

    As it turns out, Sir Frank was something of a whittle himself. Standing five foot tall and with a small chest measurement, he failed the RAF medical (twice) when he applied. Luckily for him and for the development of the jet engine, he found a way in to the RAF. And it all came good for both Sir Frank and Errol – Sir Frank applied again and rose to be Air Commodore. Errol learned to fly and was last seen flying into the distance with a noble dragon (draco nobilis) which had terrorised the city.

    Errol the dragon takes flight!
    Errol the ‘whittle’ takes flight during the climax of “Guards! Guards!”. This is the book where we meet Sam Vimes, one of the Discworld’s best characters.

    It all ends well for Sam and the rest of the Night Watch. The men get a pay rise and a new dartboard, Sam finds love and companionship with Lady Sybill.

    Whittle’s patent

    All of this leads back to the landmark invention by Sir Frank, the jet engine. In 1946, he was granted US patent 2404334 for an aircraft propulsion unit – a jet engine. This wasn’t the first, and wasn’t the last, but it does have the big advantage from my point of view that it has a striking image to go with the patent.

    Frank Whittle's 1948 patent for an 'Aircraft propulsion and power unit'.
    Cleaned-up version of the patent image. I used Inkscape to remove the background, leaving just the black images. I then saved it as a white version to show up on the dark blue t-shirt.

    T-shirt design

    The patent image used started out as shown above. Using Inkscape, I could remove the background and be left with an image of just the text and drawings. Two things need to be done before I can put the design on a t-shirt. First, I need to choose the colour for the printing. Second, I need a fine scale render (high dots per inch (dpi) count) of the image. Inkscape can do both, so I got a 500 dpi image in white (which I won’t reproduce here).

    I chose a dark blue t-shirt so that the image looks like an engineering drawing. Patents are not engineering drawings, but using blue adds a nice aesthetic to the design. Blueprints were so called because they were printed in white on Prussian Blue paper.

    There is a useful website (colordesigner.io) which will give the Hex codes for any colour so that the correct colour can be programmed into a colour rendering app. Gelato, who I use as the print on demand supplier, also give the Hex codes for their t-shirts (or at least the T-shirts I’m using). There is also a colour comparator site so that you can see how close two colours are.

    Prussian blue compared with Navy blue.
    This is a comparison of Prussian Blue (left) and Navy blue (right). Prussian is a bit more purple and lighter, but there’s not a lot of difference.

    Am I going too far with this? Maybe, but it’s best to be correct about these things even if nobody notices.

    The closest blue t shirt available was Gelato’s Navy Blue. I can’t tell the difference unless the colour are next to each other.

    So, finally, I was able to put a white design on a blue t-shirt. Then it was a matter of getting some virtual models to do virtual cat-walks for me and upload everything to Etsy.

    Another image of the model in his t-shirt. He looks well happy.
  • This is a chord…

    This is a chord…

    Hand crafted design!

    I was never a punk (always a metalhead), but I still appreciate the aesthetic and the music. The Damned, Siouxsie and the Banshees, Talking Head, Killing Joke – all good. There is a case for the punk ideal being the springboard for the new wave of British heavy metal, from which Iron Maiden sprang and made the world whole. But that’s for another blog post.

    When punk first started to take hold in London, a fanzine called Sideburn needed to fill a page in its first edition, so the co-founder (and fan of The Stranglers) Tony Moon drew the illustration below. It captures what I see as the punk attitude – anyone can have a go. Whether you will be good or successful or happy is another matter, but at least you tried.

    Original ‘This is a chord’ artwork by Tony Moon from Sideburn #1.

    It’s a wonderful mindset to have and one I wish I had embraced earlier in life. Ah well.

    With the need to start a business to bring in money since there isn’t a lot of suitable work around, I started Heath Way Prints in January 2025. Inspiration for designs isn’t a problem; finding how to transfer the idea onto a physical thing was the issue. Thank goodness for the University of YouTube.

    Taking inspiration from Tony Moon and my love of puns and maths, I realised that there are other definitions of ‘chord’. A chord is a line that crosses a circle’s circumference twice. Any triangle can be enclosed within a circle, so the three sides of such a triangle are chords. So, three chords form a triangle.

    I drew out a version of Moon’s original with this in mind.

    I tried to keep the lettering consistent with the original, but also had to bear in mind that the shape of the printing space on a t-shirt is squarer than the fanzine pages.

    All I had to do now was transfer this to a t-shirt and use a print-on-demand service to sell the t-shirts. Easy.

    Well, not so easy. I used the photo (photo because I don’t have access to a scanner) of my original to try out a t-shirt design using Gelato (the Print on Demand partner I had decided to use). The image was less than good. The white of the photo background was included in the image and it looked bad.

    I used Inkscape to remove the background. I followed a video by Daisy Multifacetica, and was able to change the colour of the text as well. So I had the option of black, white or any other colour. Really depends on the t-shirt colour.

    The black-on-white colour option is fine, as is the white on black. But there is a colour scheme that is synonymous with punk – black and pink on yellow.

    Designed by Jamie Reid, the cover of the Sex Pistols’ debut is a striking graphic and a popular colour choice in punk and punk-adjacent work. So I’ll do the same.

    I used the website schemecolor.com to get the correct pink – French Fuscia – and the hex code so I can get the right shade. The yellow isn’t really something I can control, since I am limited by what Gelato offer. Luckily, the yellow of their t-shirts is close to the yellow on the original album.

    Once I had a selection of colours I could then go to Gelato and design the t-shirt.

    In order to have a chance of selling, I need good pictures of the design in place. Luckily, Canva (another online design site) has the facility to add a design to images of models so shoppers can see how the t-shirt looks when it’s being worn. I did a few, because Etsy allows you to add 10 images and a video to the listing.

    The featured image at the top of the blog is one photo. They have a range of ages, ethnicities and genders to choose from.

    I made a montage video of the prepared images, which you can see on the listing on Etsy.

  • 3D printing an SEM image

    One of the things that has been rattling round my head for many years is the idea of 3D printing from an SEM image. I know, it’s a common issue and one you’ve all heard many, many times.

    In a previous post, I mentioned how I’d done some of this already using Blender and a bit of artistic licence. What I made needed to be printed in two part (one white, the other yellow) because I didn’t have access to a multicolour printer.

    3D printed oil in water droplet
    Original version of a 3D printed oil in water droplet. Some artistic licence required and I had to design and print in two parts. You can see the join.

    Scrolling through Blender instruction videos (as you do) I saw a post by Architecture Topics on how to convert an image into a 3D Element.

    This pinged a synapse in my brain and I wondered if the SEM of the broken oil droplet I took some years ago could be used in the same way.

    Scanning electron micrograph of a split oil droplet. I took this image about ten years ago and have been thinking about making a 3D version ever since. I can work faster. Honest.

    How hard would it be to convert the original image to a 3D Element?

    Rendering of convertion a SEM image to a 3D element

    Rendered version of the converted image. I’ve stuck to black and white since electrons don’t do colour. I could reasonably render this with a gold effect since the sample prep involved coating with gold to get better imaging.

    It took a while, but I got there. For the final render, I put the converted image into a box to hide the ragged edges of the conversion. Also I had the opportunity to go into my old work and have a go on the 3D printer there.

    After a bit of faffing (because I’d not applied a solidify modifier to the final image) I got a .stl file that the slicer said would print.

    My first attempt wasn’t great. I’d only applied enough solidify modifier to give the final print a thin shell. To quickly fix this, rather than going back into Blender and increasing the solidify level, I set the slicer to do 100% infill.

    That didn’t work. I’d need to go back to Blender and learn how best to use the 3D toolbox that I learned about while I was doing this.

  • Blender part 2

    Blender part 2

    I started a course and, unusually for me, I paid actual money for it. It’s presented by Grant Abbitt, some of whose free video tutorials I’ve seen. I did finish the low poly well, it took me a few days (no idea how many hours) and I was pleased with the result.

    Not sure where such low poly work would find a home, but it’s good to do something creative that I think will lead to better 3D prints. I just need access to a 3D printer.

    Learned quickly how to change materials and do lighting so that you get these great effects with transparent materials. This was done on the second day of the course, maybe four hours to get this far.

    What’s so good about this course is that Grant takes you through the steps to make a thing. This isn’t unique, but I see a lot of courses that show you how to use tools in Blender and other programs (Excel, for example), but there is no context.

    What he also avoids is the “Draw the rest of the fucking owl” trap that I see so often. You’ll be shown how to design something, then magically it’s all lit with a background, multiple lights and a camera fly-round.

    The original “Draw the rest of the fucking owl” meme. Original artist unknown, but it’s been around since 2010. Which is medieval by internet standards.

    I got the course through Udemy, it may be available elsewhere. It’s called “Complete Blender Creator” and I reckon it’s been worth the £15. If I was making stuff in real life it would cost me at least that much to buy some clay or paper and paints.

    More to follow. There’s a lot to learn, but I’ve got time while I’m on gardening leave. I can’t spend all day looking for work when there’s no suitable jobs.

  • Blender lessons

    Blender lessons

    Taking 3D design seriously

    I’ve been working with 3D design for about two years. As a pharmaceutical scientist, I’ve been keeping track of possibilities in 3D printing tablets and other dosage forms. There’s been some interesting recent work on this and in custom design of arm casts. At my last job, we bought an Ender 3 Pro in early ’23 and set about finding uses for it.

    Ender 3D printer. This isn’t the exact one we bought.

    I used TinkerCad for most of the design work.

    https://www.tinkercad.com/

    We used it to design all sorts of things – new funnels, inserts for spectrophotometers, toroidal propellers and flexible substrates for rheology testing. But I kept seeing Blender being mentioned when I looked on YouTube for help with 3D design. But I thought Blender was scary. Just look at it!

    Blender window as it opens.

    There’s loads of stuff on there! And that’s just one window! Sculpting? UV Editing? Eh?

    But it is supposed to be a good program to learn 3d design, animation and simulations. I’d also had an idea to make a 3d print of a SEM image I took some years ago of a fractured oil droplet.

    SEM image of a fractured oil droplet. I spent over 20 years studying these things.

    This sort of thing was beyond the scope of TinkerCAD, but it turned out it was (relatively) simple in Blender. Well, I followed a tutorial on how to add things at random over a surface. I needed this because other images we took showed that there’s bumps all over the surface of the droplets. So with a knobbly hemisphere generated in Blender, I used TinkerCAD to add the rock-like frozen fractured oil interior. Then it was a matter of slicing and printing.

    Easy.

    I’d made a doughnut in September following a YouTube course (see below), which as OK I suppose.

    A doughnut made in Blender. Looks delicious!

    After faffing around a bit, I decided to give Grant Abbitt’s Low Poly Well a try. I chose this because Grant is an excellent tutor. He’s clear, doesn’t skip over bits (no ‘draw the rest of the owl’ nonsense) and has been using Blender for 20 years. He’s also English, so he says ‘zed’, rather than ‘zee’.

    So I’m going to see how the low poly well goes. This will be under ‘Blender’ in this blog.