I love this dish, the smell fills the house when it’s in the oven. It’s also easy to prepare, although it does take a long time to cook.
We have two versions in this house, I do a slow-cooked version with cannellini beans (recipe here), Mrs S uses a pressure cooker and her recipe features oxtail soup (must be Heinz).
Both are delicious, with different textures and many common ingredients. Beef, onions, garlic, carrots for starters. I put potatoes in the stew, Mrs S does them separately. But the most important component of the stew is the dumplings.
Uncooked dumplings. You don’t need to be very rigorous getting spherical dumplings, rougher dumplings will fluff up just the same.
Dumplings are easy enough to make, as long as you use suet and self-raising flour you can’t really go wrong. A generous helping of dried herbs and chilli add some flavour. We give them 20 minutes steaming over the stew. This allows the dumplings time to swell and acquire the required soft texture and some of the flavour of the stew. It also means that some moisture from the stew is lost so the stew thickens a bit.
Dumplings done, stew ready to serve.
I’ve just noticed that there’s a very angry-looking dumpling in the middle of the picture. Just as well we ate it before anyone noticed.
The first of March is St David’s day! Triple celebrations for us, since Mrs S is 3/4 Welsh, my first name is David and it is our oldest’s birthday.
This recipe follows the hand-written recipe Mrs S got from her gran (Mrs K) in 2007.
Mrs S did the camerawork, thanks to her for helping!
Ingredients
200 g self-raising flour
100 g margarine (“baking spread” or similar)
75 g caster sugar
75 g currants
1 or 2 tbsp milk
one egg, beaten
1/2 tsp mixed spice
Video link
Mixed spice
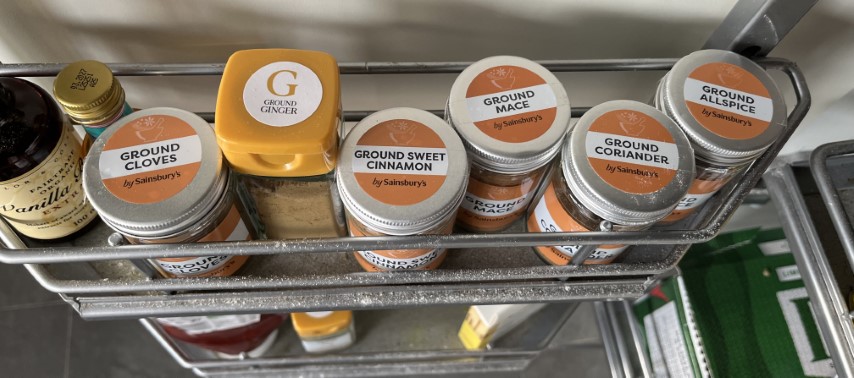
For the mixed spice I combined one teaspoon each of ground mace, cinnamon and allspice with half a teaspoon each of ground cloves, ginger and coriander (I couldn’t find ready-made spice mix in the shop). Nutmeg can also be added to the mix, but we only had whole nutmeg and I couldn’t be bothered to grind any. There are recipes Welsh cakes that say to use only mace, I may try that some time.
Spices used to make the spice mix for the Welsh cakes. This is not an endorsement of Sainsbury’s spices, by the way.
Method
Combine the flour and margarine in a bowl and rub together to make crumbs. This is the same procedure for making crumble for puddings, so it’s a proper life skill.
Then add the flour, caster sugar, currants and spice. Mrs K’s recipe calls for half a teaspoon, though she said it could be left out.
Mix well, then add the beaten egg and milk. Combine all these until you have a smooth dough. If the mix is too wet (as mine was), add flour until you get a good dough. Add milk if the mix is too dry.
We left the dough to settle for an hour, so the flour could absorb all the wet ingredients.
On a floured surface, roll out some of the dough mix to be about 5 mm (¼ inch) thick. Use a gauged rolling pin if you have one (I don’t). Cut out circles (a cutter is best for this), then the cakes are ready for frying.
A rolling pin with thickness gauges. If you need to roll out dough to a particular thickness, this is an excellent tool.
Frying the cakes
Traditionally a griddle would be used for frying. You can get flat griddles for induction hobs, but you may as well use a frying pan, as we did. Unless of course your oven has a built-in griddle, in which case I’m very jealous.
Like with any pan-fried cakes (eg pancakes) the pan needs some fat in it to help cook the food and also to provide extra non-stick. We used a 1:1 mix of vegetable oil and butter. If you want to be traditional about it, use lard. Don’t use a lot otherwise you could end up with a very fatty tasting cake.
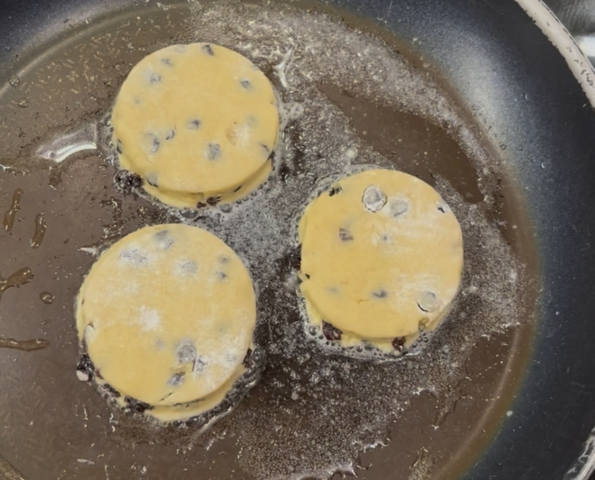
In a hot pan (or on a hot griddle) fry the cakes for about a minute on each side. You will need to use judgment here, you want the cakes to be a dark brown but not burned. The cakes will swell as they cook, so make sure they cook long enough on each side for this to happen.
Frying Welsh cakes. The cakes swell during cooking, this is the self-raising flour doing its thing. The swelling means that the outside of the cakes will be crisp but there is a soft centre.
This swelling – due to the self-raising flour – combined with frying a thick piece of dough gives the cakes their double texture. The outside will be crisp and there is a lovely soft and chewy interior. A bit like an armadillo.
When they are cooked put them on a plate with a piece of kitchen towel on to absorb excess fat. Cook the whole batch; we got 12 cakes from this mix, the size of your cutter will determine how many you get.
Serving
Sprinkle with granulated sugar as a finishing touch. They are good enough to eat warm or cold. Just eat them as they are, but if you like you can put jam, honey or Nutella on them, spread some butter or thick cream on them. As a savoury alternative, pop a chunk of cheese (Caerphilly might be appropriate) on it, if you’re one of those people who likes cheese with fruit cake.
Finished Welsh cakes. We ate them with just the sprinkling of sugar. You eat them however you want, you made them after all.
Changes
Having eaten my share and discussed with Mrs S and the rest of the family, I think we will add a full teaspoon of spice to the next batch. Mrs K wasn’t one for spicy food, so her taste buds were likely more sensitive than ours.
It may well be possible to air-fry these. We don’t have an air-fryer, but if you do let me know if it’s doable.
This is very quick to make and adaptable. If you’re not keen on smoked fish, add more cheese. If you love smoked fish either reduce the cheese or just eat the fish as is.
Mrs S did the camerawork, thanks to her for helping!
Ingredients
2 smoked mackerel fillets
100g cream cheese (Philadelphia or other)
Horseradish sauce or fresh horseradish (optional)
Cayenne pepper (half a teaspoon or so)
Fresh parsley
Crackers to serve
Butter, if you’re going to keep it for a while.
Simply add the ingredients to a food processor and whizz up to the desired consistency. You can keep a few flakes back if you want a few lumps.
I’m not keen on horseradish, but Mrs S loves it. So there are two versions of this, one with and one without.
If you want to keep the pâté for a while, put some in a ramekin. If you’re like us you may have a cupboard full of empty Gü pots – these make excellent ramekins for pâté. Melt some butter in a pan and pour a thin layer over the pâté. This should keep for three days, though it never lasts quite that long in our house.
You can get smoked mackerel with black peppercorns on – this can also be used but will obviously add pepper to the flavour. And you can add black pepper instead of cayenne or paprika if you want that sharpness that black pepper brings.
The crackers are Tesco’s own salt and pepper crackers. These are some of the best I’ve ever had, they bring out cheese flavours in a way that few other crackers do. They aren’t as good a Peter’s Yard sourdough crackers, but also not quite as expensive.
Something a bit different – a recipe video! Yorkshire puddings are a great accompaniment to any roast, most traditionally with roast beef.
Mrs S did the camerawork, thanks to her for helping!
Ingredients
45 g plain flour
A pinch of salt
One egg
Water and/ or milk
Fat or oil for cooking
Add the flour, salt and egg to a mixing bowl and mix well. You can add other ingredients here – I often add black pepper or chilli flakes to add some interest to the puddings.
Add water or milk to make a batter. I’ve used water here because I like crispy puddings, you can add milk or 50/50 milk and water to get fluffier puddings if you prefer.
Allow the batter to rest for at least an hour, longer if possible. This gives the starches in the flour a chance to absorb all the moisture and gives you a smooth batter.
Pre-heat the oven to at least 220 °C, gas mark 8. Turn the fan off, if you can; this stops the puddings getting blown out of shape as they rise. Put fat or oil into a suitable dish and heat this through. I used beef fat here; I’d just roasted a beef joint and there was plenty of basting fat. Normally I use vegetable oil or peanut oil. The fat needs to be able to withstand high temperatures, so avoid olive oil.
Add the batter to the hot fat. Bake for 15 minutes – don’t open the oven! Our oven has a glass door, yours may not, but don’t peek or the puddings might collapse!
When they’re done, serve with your roast dinner.
You can also make huge Yorkshires and serve a dinner inside them. Or, once they’re cooled, some people like to have jam or honey on the puddings as a dessert.
A favourite most of the year, more so when it’s chilly. This version takes two hours or more to cook. There’s a fast recipe that takes less time and uses a pressure cooker.
Timings: prep – 10 min Cook – 2 hours (or more)
Feeds four. Total cost (Nov 2025): £6.00 (stew) 60 p (dumplings)
Timings: Prep: 30 min. Cooking: 40 min Eat: 10 min
Ingredients
Stew
400 – 500 g cubed beef
Half a diced onion
two cloves garlic
two carrots, diced
400 g potatoes, cut into 2 cm pieces
one turnip, dice to the same size as the potatoes
Dried herbs – oregano, thyme and a bay leaf
Fresh rosemary (from the garden)
chilli flakes
beef stock pot
Veggie gravy granules
can of cannellini beans
Dumplings
100g self raising flour
50g suet (beef or vegetable)
Salt and dried herbs (a teaspoon or so of oregano, some black pepper and anything else you fancy)
water
The beef is the main cost of this dish, you can economise a bit but with cheaper beef you get more hard fat, which is unpleasant.
You’ll need a frying pan and a casserole dish.
Your choice of veg to add to the stew is personal, of course. I add turnips because they add an earthy taste to the stew, which not everyone likes.
1923 Bamforth postcard celebrating the turnip. James Bamforth & Co were probably best known for their saucy seaside postcardsTurnip! Baldrick’s favourite vegetable, they add an earthy flavour to the stew. Swedes can also be used.
Preheat the oven to 160 C/ gas 5.
Brown the beef in a little oil and add to the casserole dish when done. Fry the onions, garlic, herbs and spices before adding them to the pan. Dice the potatoes and turnip and add these to the rest of the ingredients. Add the stock pot or stock cube.
Beef, potatoes and turnip in the pot. Onions, garlic and herbs are hidden. Need to add cannellini beans and stock.
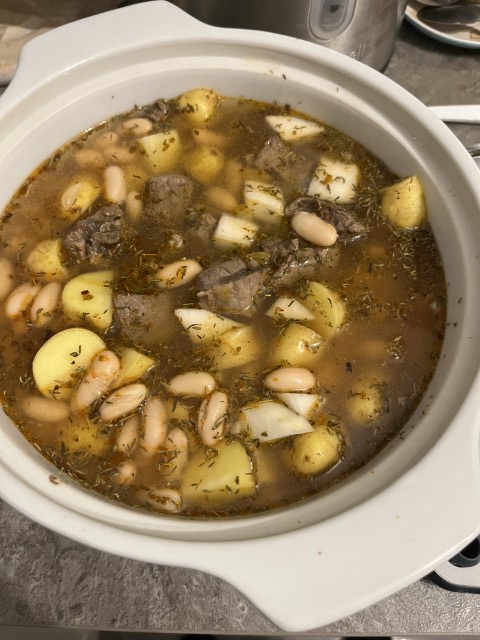
Drain a can of cannellini beans, add these and enough water to cover the ingredients. Give the while thing a good stir and put in the oven for at least 2 hours.
Beans and stock added. Now to cook for at least two hours.
Make the dumplings: Add the flour, suet, herbs and salt to a bowl. Gradually add water and stir well to get a dough that you can form into balls. These don’t need to be perfect. If the dough is too wet, add flour to the mix until you’re happy with how the dough behaves.
Uncooked dumplings. You don’t need to be very rigorous getting spherical dumplings, rougher dumplings will fluff up just the same.
About 20 minutes before serving, add the dumplings to the stew and cook for a further 20 minutes.
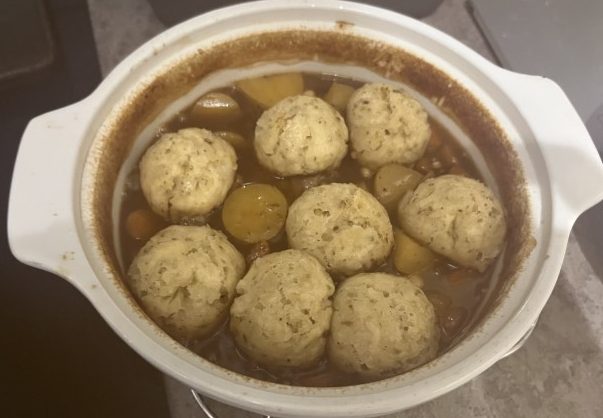
Dumplings done, stew ready to serve.
I did this using the slow method because we had to split out mealtime. Younger daughter has tap lessons that run until nearly 9 o’clock, so I served the rest of us at seven, then reheated the stew and added fresh dumplings to cook while I went to get her.
Younger daughter made this for us, loosely based on a recipe from BBC Good Food but adapted somewhat. This is a spicy version, alter the amount of chilli as you wish.
Timings: Total = 2 hours. prep – 10 min Cook – 30 minutes. Total includes ‘leaving to absorb flavours’ time.
You’ll need a roasting dish, a large saucepan and a blender. We used a stick blender for this. A large plastic food box or a large zip-tie bag will also be needed.
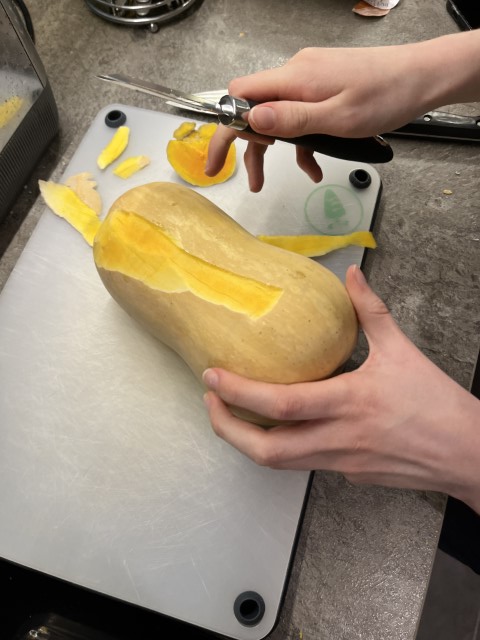
Peel, deseed and dice the butternut squash.
The skin of the butternut squash is quite thick. Either use a good peeler or a knife to remove the skin. Scoop the seeds out with a tablespoon. You can dry them off and separate from the stringy bits then roast them for a snack.
Add the olive oil and paprika to a large plastic food box or a large bag. Add the diced squash, mix well and leave for an hour to absorb the flavours. You can use a bowl to do this if you don’t have a box or bag to hand.
Set the oven to 180 C/ gas 6. Fry the onions in butter over a low heat. After 5 minutes, add the garlic and chilli flakes and continue to fry.
While the onions are frying, put the squash and the oil into a roasting dish and roast for 30 minutes. Stir them at least once during the roasting.
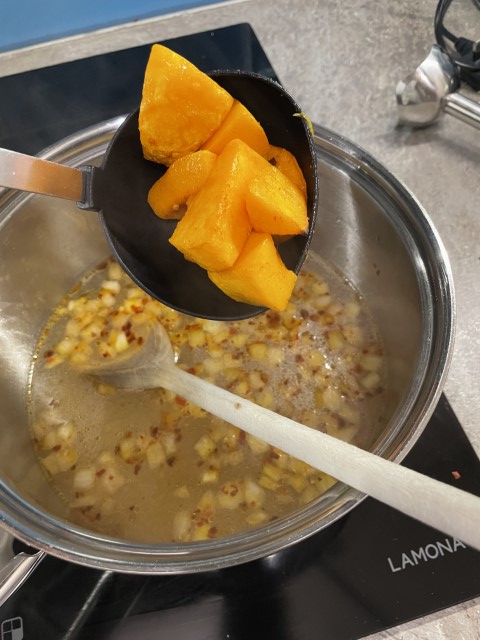
After 30 minutes the squash will be soft (squashy!) and the onions slightly caramelised. Add the vegetable stock to the onions. Take the squash out of the oven and add this to the stock.
Diced squash, roasted. Add the roasted squash to the onions and stock. This will add some much-needed colour to the soup.
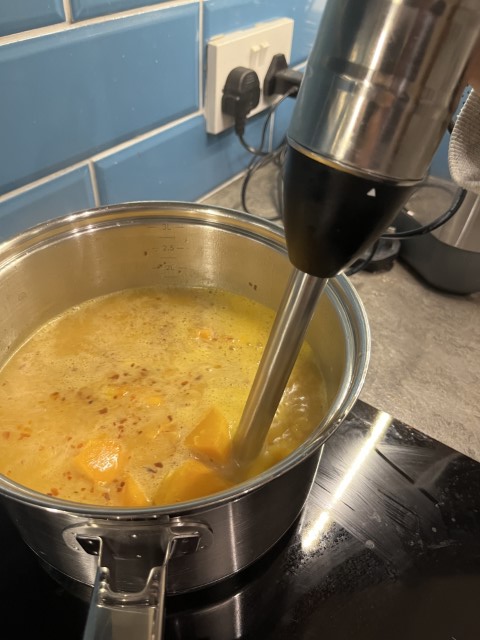
Using the stick blender (or other device), liquidise the soup until it’s smooth and lump-free.
The stick blender makes the mushing up of the squash easy. If you want a smoother soup, a liquidiser is a better bet.
Warm through and add the crème fraiche either to the completed soup or swirl into each serving as you dish up.
Finished soup. We got some crusty bread to go with it. A sprinkling of parmesan would also add to the flavour.
We got some nice bread to go with this, though regular Warburtons (or other sliced bread) is fine as well.
You’ll need a big saucepan, a large bowl and a baking dish. An electric mixer will also help.
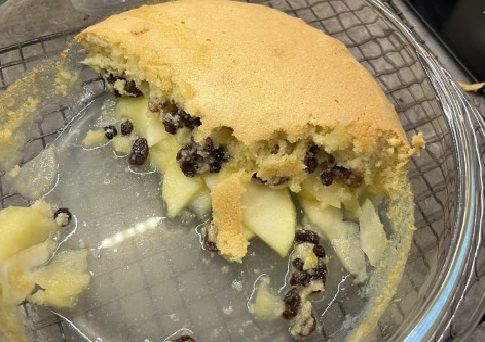
Peel and slice the apples and heat gently in a saucepan. Add the caster sugar to taste2 and lemon juice to stop the apples going brown. Once they have started to fluff up turn off the heat and allow to cool. Take the butter out of the fridge.
When the apples are cooled, set the oven to 160 °C (fan), gas mark 5. Put the apples into a buttered oven-proof dish. If you’re adding dried fruit or mincemeat put this on top of the apples.
Apples in a dish with some dried fruit on top. This is the stuff that I use for fruit cake, it includes dried peel as well as raisins and sultanas.
Start making the sponge while the oven heats up.
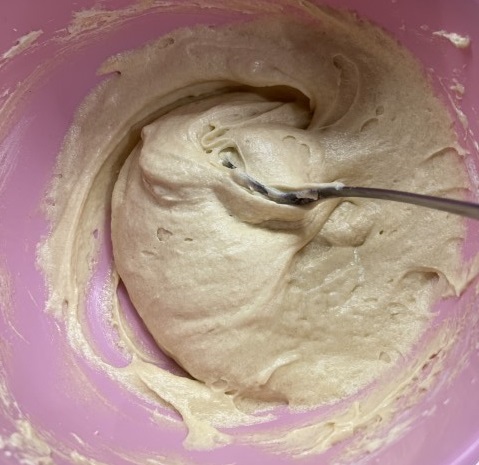
Add caster sugar, butter and self-raising flour to a mixing bowl. I used a plastic bowl – ceramic bowls are supposed to be better for this type of thing since they keep the batter cool. Crack the eggs into the dry ingredients and beat for at least five minutes. An electric mixer is best for this, do it by hand if you’re feeling strong.
Finished sponge mix. You need to mix this for at least five minutes to get air in so the sponge will rise.
Put the sponge mix on top of the apples. Make sure it’s covering the apples, then pop it in the oven for 40 to 50 minutes.
When it’s done, the sponge should have risen and be a nice golden colour.
Eve’s pudding. Remembered while I was dishing up that I needed a photo for the blog.
Serve hot with custard (method below) or ice cream.
With custard!
Custard
Make the custard when you’re ready – this should be timed to make sure the Eve’s Pudding is still warm.
Put the cream and milk in a pan and warm through to just below boiling. If you have a thermometer, heat the milk to about 85 °C.
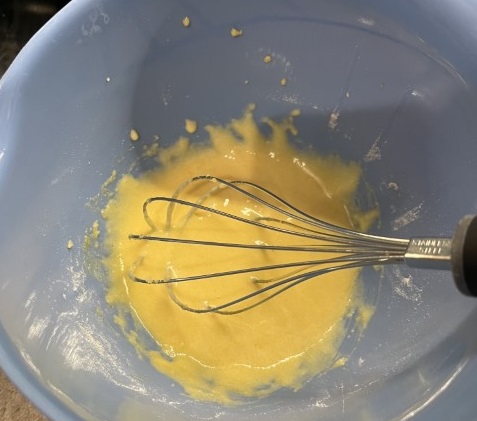
In a large bowl, whisk the egg yolks, cornflour, sugar and vanilla. A hand whisk will be fine for this.
Cornflour, sugar, egg yolk and vanilla essence, mixed and ready to have warm mil added.
Gradually pour the hot milk onto the sugar mixture, whisking constantly. Two of us did this together (I had help from younger daughter, who made crème anglaise in Food Tech at school); she poured and I whisked.
Pour the mixture back into the saucepan. Heat gently with stirring until it thickens to your liking. Don’t heat for too long or it might curdle.
Custard warming through and thickening up.
These are the best cooking apples. If you can’t get these because they’re out of season or you live outside the UK, Granny Smiths or other cooking apples will do. ↩︎
Tastes vary. Bramley apples are famously tart, you may want a lot of sugar. Unless you’re like my grandad who used to eat Bramleys as eating apples. ↩︎
Oven cooked meatballs! Remember to use a big pan for the tomato sauce or the meatballs won’t fit in.
Feeds four.
Timings: Prep: 20 min. Cooking: 40 min Eat: 10 min
Ingredients
500 g chicken mince
100 g breadcrumbs
A good pinch of salt
One egg
100g chorizo
A can of tomatoes
Onion and garlic
Vegetable stock cube/ stock pot
About a teaspoon each of dried oregano, thyme and chilli flakes. Add other herbs to your liking, and black pepper.
2 tablespoons oil (peanut, vegetable or whatever is to hand)
Pasta – about 75 g dry weight per person.
You’ll need two big saucepans and a baking tray. Oven to 180 C (fan), gas mark 6.
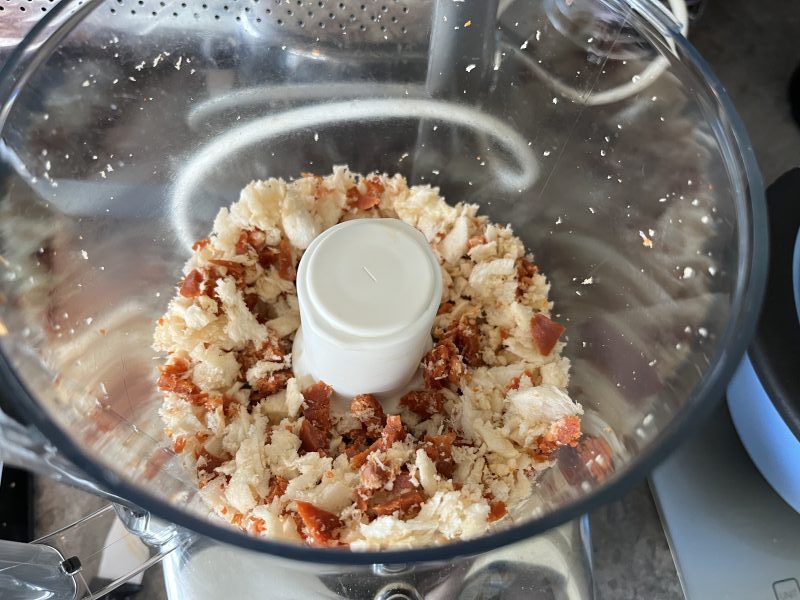
If you can’t get chicken mince, use a blender to mash up the required amount of chicken thighs1. Use the same blender to shred the chorizo (and make the breadcrumbs, unless you want to buy them).
Breadcrumbs and shredded chorizo in a Minimixer.
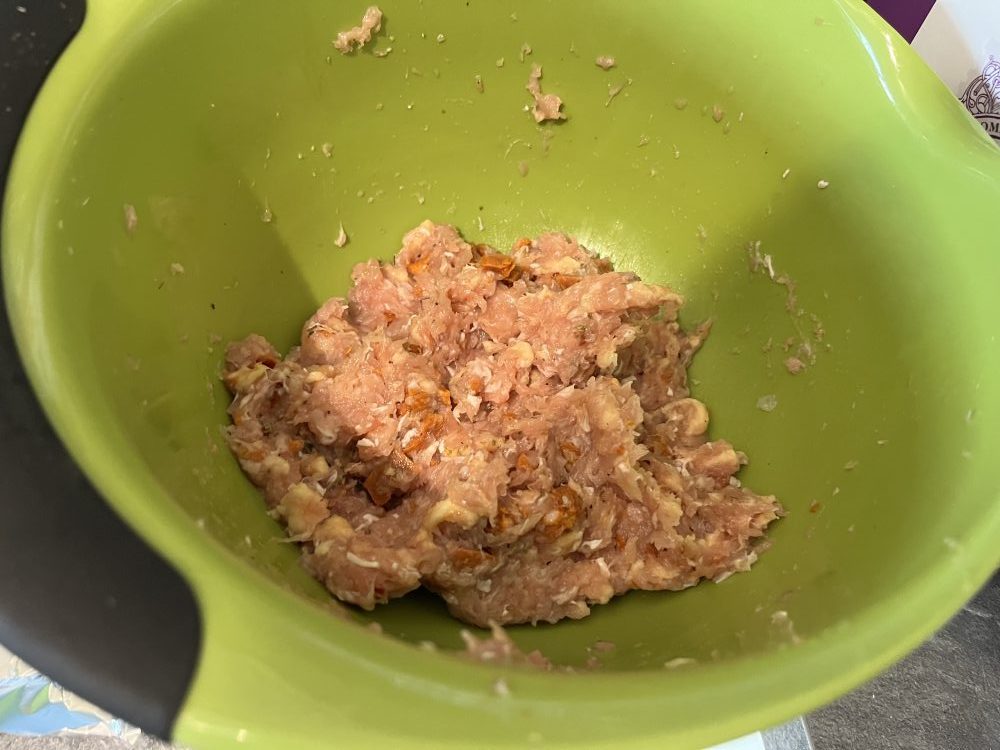
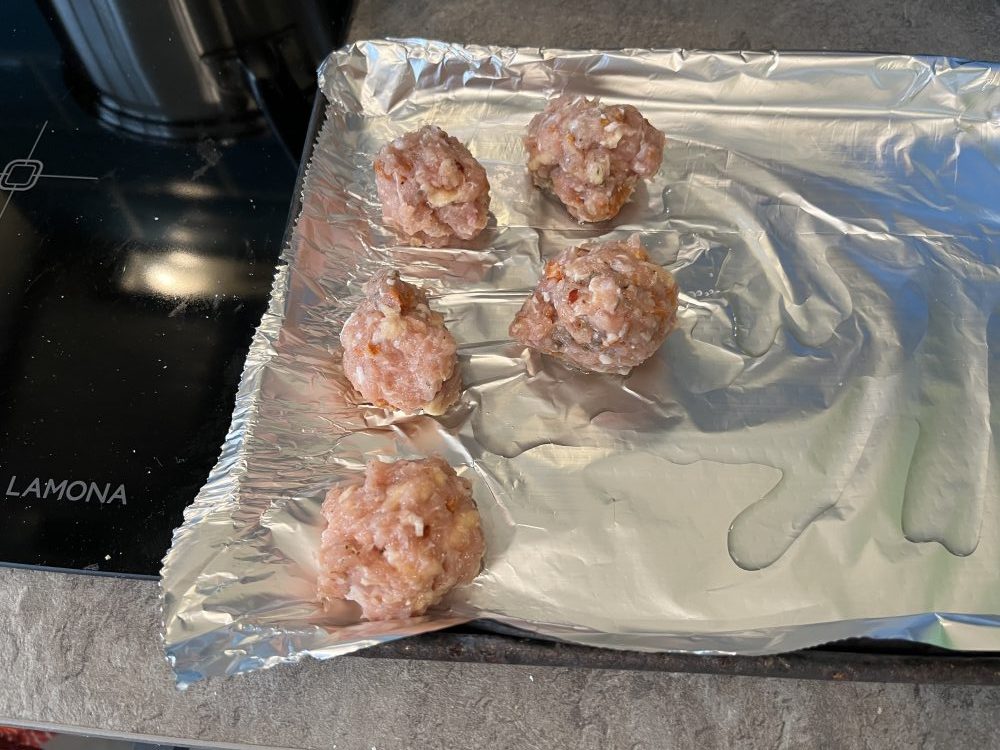
Combine the mince, chorizo, breadcrumbs, egg, salt, herbs and spices in a bowl and mix well. You can do away with the egg if you add more salt or leave the mix for longer – overnight is best2. Form into 12 or so meatballs. Smaller ones will cook quicker, you might make 20.
Meatball mix. The salt and egg help to bind the meatballs.
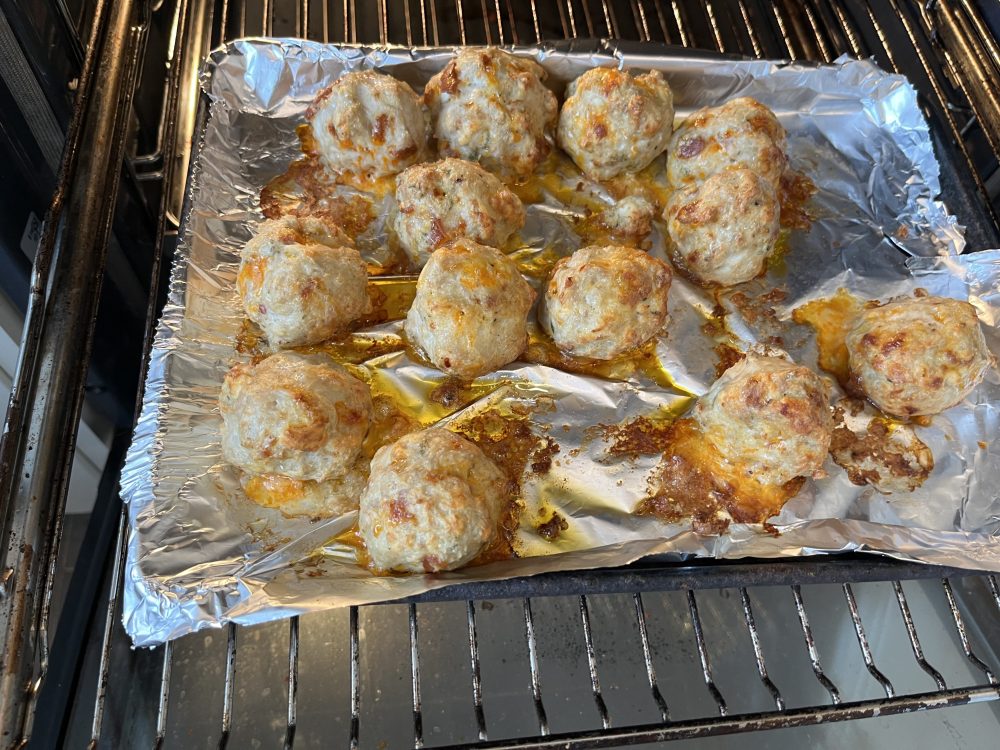
Distribute the raw meatballs onto a baking tray with an oiled baking sheet. Brush with a little oil and bake for 20 minutes until browned – check they are done with a meat thermometer if you have one.
Ready to cook, raw meatballs on an oiled, foiled baking tray. The oil helps brown the meatballs and lessen sticking to the foil.
While the meatballs are in the oven, make the tomato sauce. It would be an option to make this earlier – a couple of hours earlier – since the flavour improves with time. Depends on how busy you are.
Fry chopped onion at a low heat for at least 5 minutes until they are translucent. If you have time, fry at a very low heat for even longer until they caramelise. Add garlic, spices and dried herbs, fry for another minute.
Add the tin of tomatoes, rinse out with half a can of water and add this to the sauce. Add the stock cube/ stock pot and simmer.
Boil the pasta as directed on the packet. It’s a good idea to time it so that the pasta is done about five minutes after the meatballs are come out of the oven.
Meatballs after 20 minutes in the oven. A bit of browning adds flavour. An yes, OK, they did stick to the foil a bit.
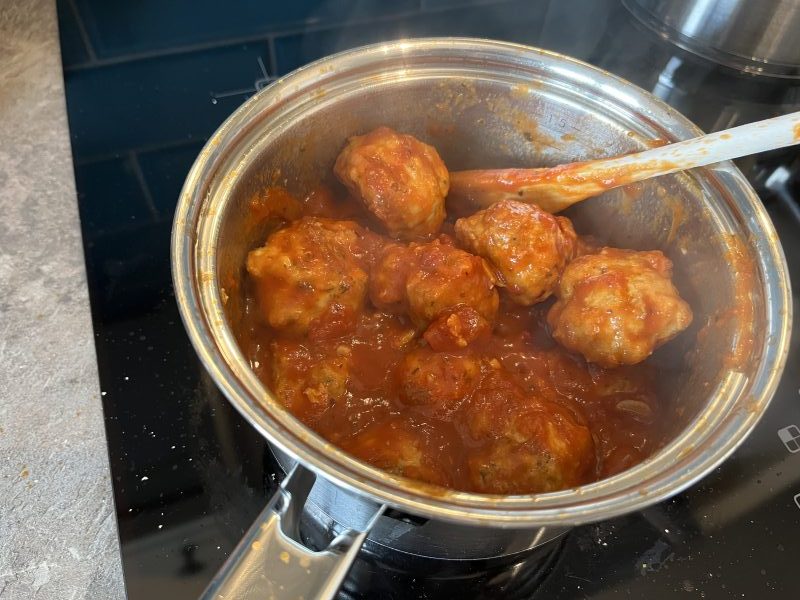
Once the meatballs are cooked, transfer them into the pan with the sauce. This is why you need a big saucepan and I never made the mistake of using a small saucepan. Oh no, siree, matey Bob!
Meatballs in tomato sauce, ready to dish up.
Garlic bread goes well with this.
Chicken thigh are tastier than breast, but not as aesthetically pleasing. ↩︎
I think I got this tip from Gordon Ramsey. The salt breaks down some of the protein in the meat and helps the mixture bind by creating a natural glue. ↩︎
Timings: Prep: 10 min. Cooking: 10 min Eat: 10 min
Ingredients
Two large chicken breasts (or three small ones)
Mangetout – about 100 g
Green curry paste, 40 or 50 g (I used Mea Ploy brand for this one)
A can of coconut milk (400 ml)
Jasmine rice (200 g uncooked rice is enough for three)
2 tablespoons oil (peanut, vegetable or whatever is to hand)
You’ll need a big saucepan and a large frying pan.
Slice the chicken breasts. I prefer slices to chunks for this recipe, but you do whatever you like best.
Rinse the rice. Boil about 600 ml water in a large saucepan (more water is fine), add salt and boil the rice while you cook the chicken. The rice will take about 10 minutes to cook.
Fry the green curry paste in the oil. If you’ve bought a one-meal batch of paste, use it all. The paste I’ve been using (see picture below) says to use 50 g. This was at the top end of our tolerance for spicy heat, so I’ve used 40 g since the first time. This makes a curry that’s hot enough to enjoy without feeling challenged.
This is the green curry paste I’ve been using. It’s spicy enough for us without added chilis, as the serving suggestion shows. This pot cost about £3, it’s good for eight to ten meals. Bargain!
Fry for a minute, then add some of the cream from the coconut milk. To make this easier I store the can of milk upside down so that there is a plug of cream when you open the can.
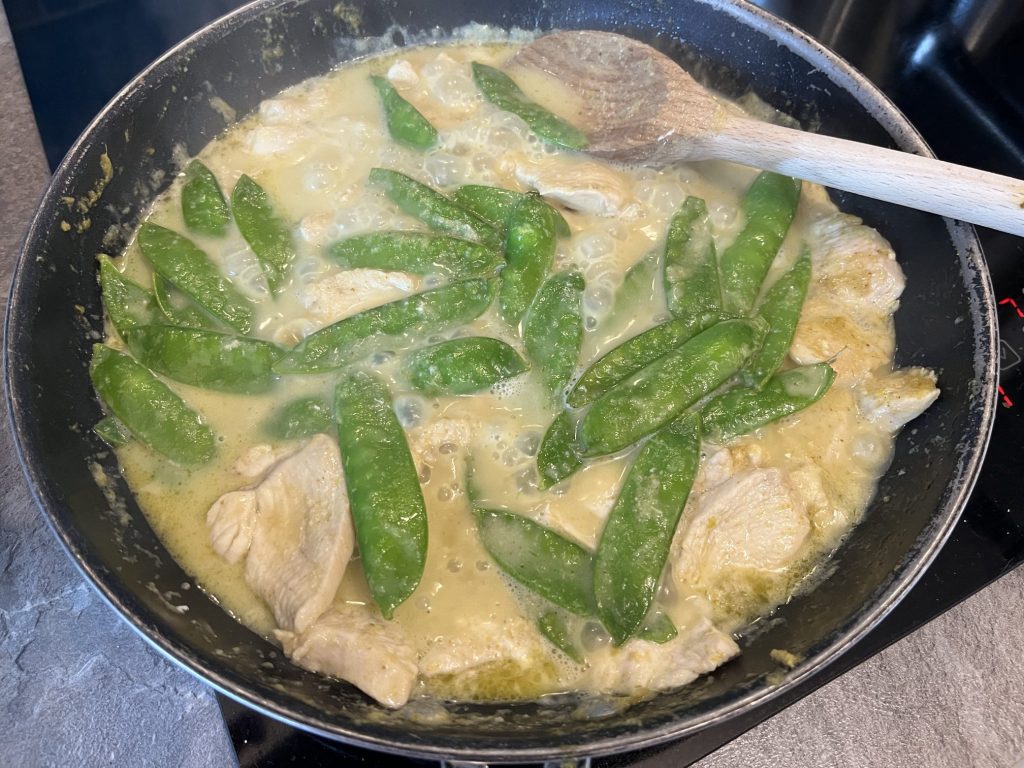
Once the paste and cream are combined and smelling good, add the sliced chicken. Fry until the chicken has gone white on the outside, then add the rest of the can. If you don’t want too much sauce, don’t add all the coconut water from the can.
Stir while cooking and remember to keep an eye on the rice.
About two minutes before the rice is done, add the mangetout. It’ll want a couple of minutes cooking to get warm, but don’t leave it too long or it’ll go soft.
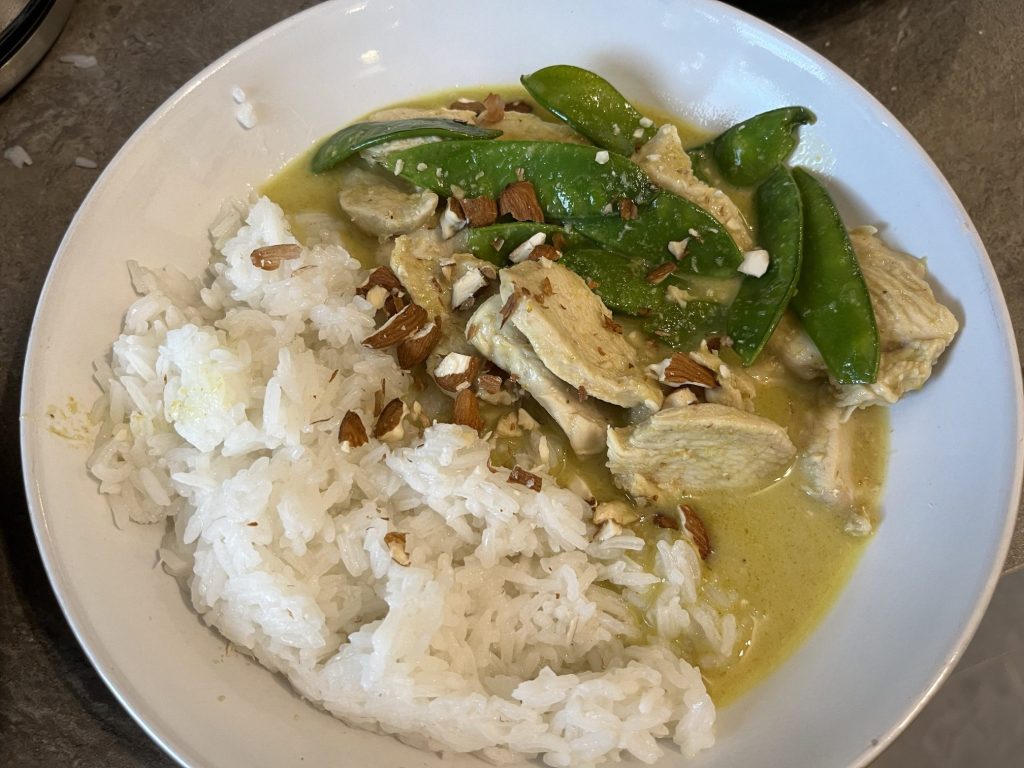
Chicken curry nearly ready for dishing up. Just give the mangetout a minute or two in the sauce. That’s enough to warm it through without losing the crunch.
I crushed a few almonds to add on top – peanuts or any other nut will do, but we had almonds in the pantry.
Once the rice is done, strain in a sieve. If it’s a bit claggy for your liking, rinse with boiling hot water before serving.
Dinner’s ready! Thai green curry with jasmine rice. Some crushed almonds add a crunch.
There’s usually quite a lot of sauce. Make sure there’s enough rice to soak it all up.
We usually have ‘Thai inspired crackers’ with this. Last time, it was a Tesco own brand bag, I don’t think we’ve ever stretched to Sharwood’s own brand. Same with the coconut milk – it’s usually supermarket own brand.
I keep meaning to look into how to make my own green curry paste. I don’t know what the minimum amount is that can be made or how well it keeps. I don’t want to make a kilo of paste and it all go to waste.
Timings: Prep: 50 min. Cooking: 30 min Eat: 15 min (finished just in time for Doctor Who)
Ingredients
500 g beef mince (5% fat)
One onion, diced
4 gloves garlic, chopped
Tin chopped tomatoes
Tomato puree
2 carrots
Herbs – using dried herbs, basil, oregano, thyme. A teaspoon of each.
Chili flakes because we like them
veg stock and beef stock (can overpower the flavour of everything else)
2 tablespoons oil (peanut, vegetable or whatever is to hand)
700 g potatoes (I used baking potatoes)
100 ml full fat milk
50g butter
Oven to 180 C (fan). You’ll need two big saucepans and a frying pan as well as an ovenproof casserole dish for the pie,
Meat sauce
Brown the mince until it goes uniform brown and no red bits.
Meanwhile, fry the chopped onions in the oil until they go translucent, then add chopped garlic and fry for another minute. Add the dried herbs and chilli flakes, and stir these in to release the aroma.
Add the tin of tomatoes and a squeeze of tomato puree. Add the browned mince, veg stock (and beef stock) and stir well. Turn off the heat.
Mash
Peel and dice the potatoes. Boil potatoes for about 20 minutes until soft. This is where the type of potato is important; waxy potatoes don’t make good mash. You can keep a portion of the water used to boil the potatoes to add to the mash.
Add a splash of milk and the butter, mash the spuds until they’re a smooth consistency. Add more milk if needed, this will depend on the starch content of the potatoes. Some of the starch-rich boiling water can also be added.
Mash ready for use. Either with sausages and beans or gravy or as a topping for cottage pie, shepherd’s pie or farmhouse pie.
Assemble the pie
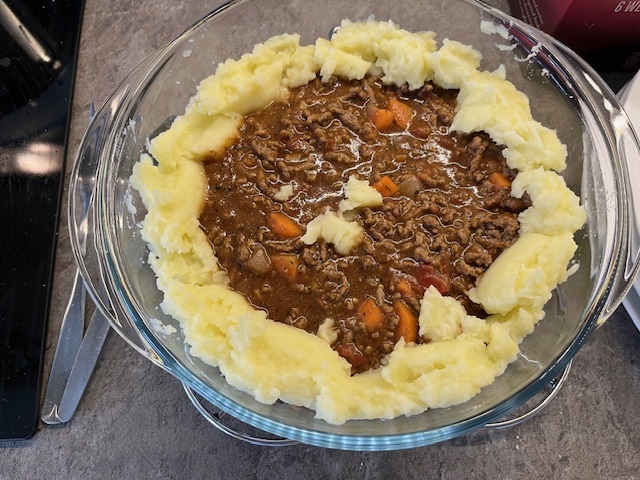
Pour the meat sauce into an ovenproof dish.
First part of the mash is on. It’s best to add a ring around the edge and move inwards, it stops the filling sinking too much.
Add the mash to the top. I was told (can’t remember who by) to add the mash around the edge to begin with and work to the middle. This stops the meat bulging at the edges. To even out the mash, use a fork to flatten the topping and add a bit of texture to the top.
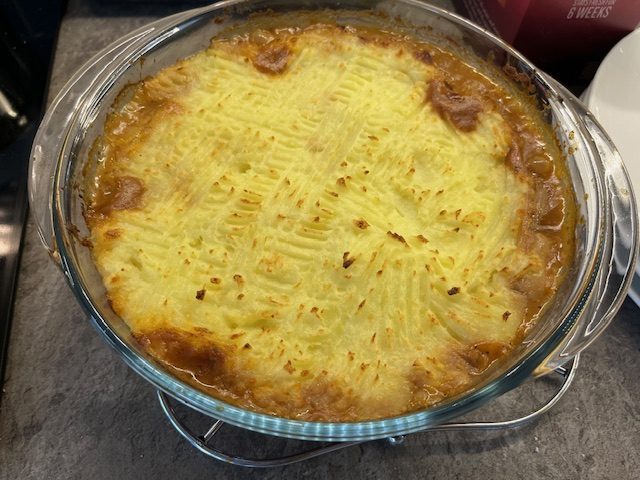
Ready for the oven! Adding a few fork strokes evens out the topping and gives ridges that catch a bit more heat and caramelise.
If you’re able, you could pipe the mash over the filling. They do this is some places, but I didn’t have the equipment, inclination or runny enough mash.
Shove it in the oven for 25minutes. Turn on the grill and brown off for 5 minutes or so.
Dinner’s ready! After 25 min in the oven and 5 minutes under the grill, the mash is browned and there is some leakage of filling.
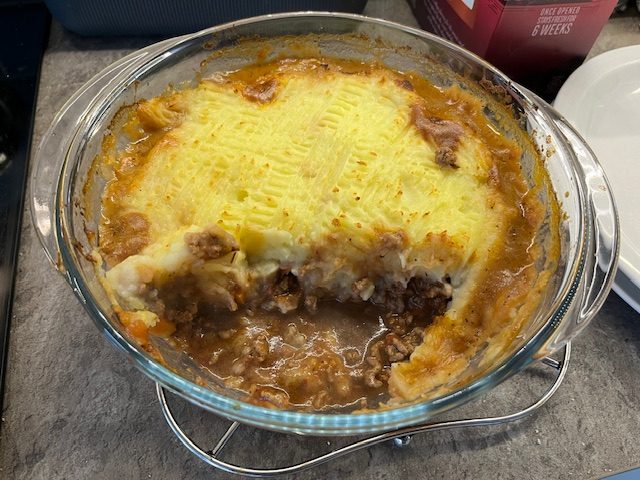
This is enough for four people. Since there’s only three of us at home at the moment, I’ll get to have this for my lunch tomorrow! That’s a win!
The first serving was taken from the cottage pie. The beef stock overpowered the other flavours, but it was still a delicious meal.
On reflection, the beef stock could have been left out. There are enough herbs and a veggie stock cube added the base flavours.